
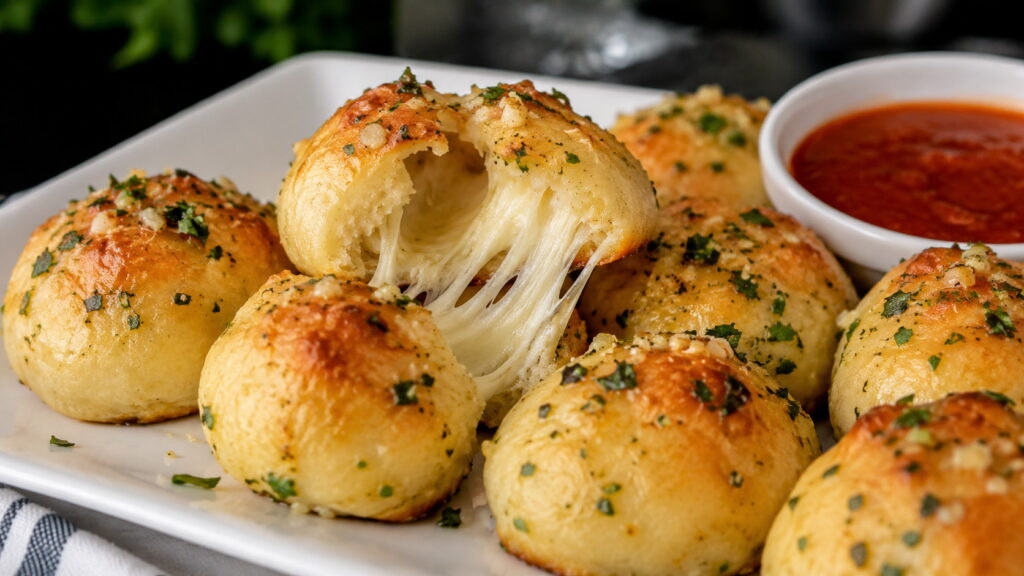
Pillsbury biscuit garlic butter cheese bombs recipe is one of those simple, crowd-pleasing dishes that delivers maximum flavor with minimal effort. Soft, fluffy biscuit dough wraps around melty cheese, then gets coated in rich garlic butter—creating a bite-sized snack that’s crispy on the outside and irresistibly gooey inside.
This recipe shows you exactly how to make perfect cheese bombs every time, including how to seal them properly, choose the best cheese, and avoid common baking mistakes. You’ll also discover flavor variations, serving ideas, and storage tips so you can adapt this recipe for any occasion—from quick snacks to party appetizers.
Expect a comfort food classic that feels homemade but comes together in under 30 minutes.
In This Article
Pillsbury Biscuit Garlic Butter Cheese Bombs Recipe at a Glance
Quick Overview
- Prep Time: 10 minutes
- Cook Time: 12–15 minutes
- Total Time: 25 minutes
- Servings: 8–10 cheese bombs
- Skill Level: Beginner-friendly
What Makes This Recipe So Easy
- Uses pre-made Pillsbury biscuit dough, eliminating mixing and kneading
- Requires only a handful of ingredients
- No special equipment beyond a baking tray or dish
- Perfect for beginner cooks or quick cravings
Kitchen Equipment You’ll Need
- Baking sheet or small baking dish
- Mixing bowl (for garlic butter)
- Pastry brush or spoon
- Oven (preheated to 375°F / 190°C)
What to Expect When They’re Done
- Golden brown tops with a slightly crisp exterior
- Soft, fluffy biscuit texture inside
- Melted cheese center that stretches when pulled apart
- Rich garlic butter aroma with a hint of herbs
Ingredients Breakdown for the Best Pillsbury Biscuit Garlic Butter Cheese Bombs
Core Ingredients
- 1 can Pillsbury refrigerated biscuit dough (8-count)
Provides a soft, airy structure that bakes quickly and evenly. Each biscuit becomes one cheese bomb. - 4 oz mozzarella cheese (cut into cubes)
Mozzarella melts smoothly and gives that classic cheese pull. - 3 tablespoons unsalted butter (melted)
Acts as the base for the garlic coating and adds richness. - 2 cloves garlic (minced)
Fresh garlic delivers bold flavor. Garlic powder can work in a pinch but lacks depth. - 1 tablespoon chopped parsley (fresh or dried)
Adds freshness and balances the richness of the butter and cheese. - ¼ teaspoon salt
Enhances overall flavor, especially important when using unsalted butter.
Optional Flavor Boosters
- Grated parmesan cheese for a savory, slightly nutty finish
- Italian seasoning for a herbaceous twist
- Red pepper flakes for a subtle heat
- Garlic powder for extra garlic intensity
Ingredient Notes for Better Results
- Use low-moisture cheese to prevent excess liquid from leaking out during baking
- Cut cheese into small, even cubes so they melt uniformly
- Avoid overfilling each biscuit—too much cheese can cause bursting
Ingredient Substitutions
- Swap mozzarella with cheddar for sharper flavor
- Use string cheese pieces for easy portioning
- Replace butter with olive oil for a lighter version
- Try plant-based biscuit dough and vegan cheese for a dairy-free option
Each ingredient plays a specific role in texture and flavor, so small adjustments can noticeably change the final result.
Choosing the Right Cheese for Perfect Melt and Stretch
Best Cheeses for Gooey Centers
Getting that signature cheese pull depends heavily on the type of cheese you choose. Some melt beautifully, while others turn oily or separate.
- Mozzarella (low-moisture): Best overall choice for stretch and clean melt
- Cheddar: Rich and flavorful, but less stretchy
- Monterey Jack: Smooth melt with mild flavor
- String cheese: Convenient and perfectly portioned
Tip: Combining mozzarella with a small amount of cheddar creates both stretch and flavor depth.
How to Prevent Cheese Leaks
Cheese bombs can burst open if not sealed properly or if the cheese releases too much moisture.
- Keep cheese cubes small and centered
- Seal dough tightly by pinching edges completely closed
- Place the seam side down on the baking tray
- Avoid overstuffing
Important: Cold cheese straight from the fridge holds its shape longer during baking, reducing leaks.
Flavor Pairing Ideas
Simple cheese bombs can easily be upgraded:
- Mozzarella + pepperoni for pizza-style bombs
- Cheddar + jalapeño for a spicy kick
- Mozzarella + parmesan + herbs for a more gourmet feel
Step-by-Step: How to Make Pillsbury Biscuit Garlic Butter Cheese Bombs
Step 1: Prep the Dough
Open the can of Pillsbury biscuits and separate each piece. Flatten each biscuit gently using your hands until it forms a small round disc (about 3–4 inches wide).
Tip: Don’t roll too thin—keeping some thickness helps create a fluffy interior.
Step 2: Add the Cheese Filling
Place one cube of cheese in the center of each flattened biscuit.
- Keep the cheese centered
- Avoid touching the edges with cheese
Step 3: Seal the Cheese Bombs
Carefully fold the edges of the dough up and around the cheese.
- Pinch seams tightly to seal
- Roll gently into a smooth ball
- Place seam-side down on your baking sheet
Warning: Poor sealing is the #1 reason cheese leaks out.
Step 4: Arrange for Even Baking
Place each ball on a lined baking sheet or lightly greased dish.
- Leave space between each piece for even heat circulation
- For pull-apart style, place them closer together
Step 5: Bake Until Golden
Bake in a preheated oven at 375°F (190°C) for 12–15 minutes.
Doneness cues:
- Tops are golden brown
- Dough feels set and slightly firm
- Cheese inside is fully melted
Step 6: Add Garlic Butter Finish
Immediately after baking, brush generously with prepared garlic butter (see next section).
Tip: Brushing while hot helps the butter absorb into the biscuit for deeper flavor.
Garlic Butter Magic: How to Get That Restaurant-Style Finish
How to Make the Perfect Garlic Butter
In a small bowl, mix:
- 3 tablespoons melted butter
- 2 cloves minced garlic
- 1 tablespoon chopped parsley
- Pinch of salt
Optional additions:
- Grated parmesan
- Italian seasoning
- Chili flakes
When to Apply Garlic Butter
Timing changes the final flavor:
- Before baking: creates a baked-in garlic flavor and slightly crisp top
- After baking (recommended): delivers a rich, glossy finish and stronger aroma
- Both: best of both worlds—deep flavor + bold finish
Pro Technique for Maximum Flavor
- Brush once right after baking
- Let sit for 2 minutes
- Brush lightly again before serving
This double-layer method creates a buttery, aromatic coating that mimics restaurant-quality garlic bread.
For safe handling of dairy-based ingredients like butter and cheese, refer to food safety basics from the USDA: https://www.usda.gov/food-safety
Final Texture and Flavor Result
- Outer layer: lightly crisp and buttery
- Inside: soft, fluffy biscuit
- Center: gooey, melted cheese
- Flavor: rich garlic butter with a hint of herbs
Getting the garlic butter right transforms these from simple snacks into something truly memorable.
Pro Tips for Soft, Fluffy, and Perfectly Golden Cheese Bombs
Control the Dough Texture
- Keep biscuit dough slightly thick when flattening. Thin dough can dry out or tear during sealing.
- Handle gently—overworking the dough makes it dense instead of fluffy.
Bake at the Right Temperature
- Stick to 375°F (190°C) for even cooking.
- Lower temperatures can make the dough undercooked inside, while higher heat may brown the outside too fast.
Get Even Browning Every Time
- Use the middle rack of your oven for balanced heat
- Rotate the tray halfway through baking if your oven has hot spots
- Lightly brush tops with butter before baking for a deeper golden color
Keep the Centers Gooey
- Use cold cheese so it melts slowly
- Bake just until golden—overbaking reduces that soft, melty center
Key takeaway: Perfect cheese bombs are about balance—golden outside, fluffy inside, and molten cheese in the center.
Common Mistakes to Avoid When Making Pillsbury Biscuit Garlic Butter Cheese Bombs
Even simple recipes can go wrong without a few precautions. Here are the most common pitfalls and how to avoid them:
Overstuffing the Dough
Too much cheese may seem tempting, but it often causes bursting.
- Stick to small cubes (about ½–1 inch)
- Leave enough dough to fully seal
Not Sealing Properly
Open seams lead to melted cheese leaking out.
- Pinch edges tightly
- Roll into a smooth ball with no visible gaps
Baking at the Wrong Temperature
Incorrect heat affects both texture and doneness.
- Too hot → burnt outside, raw inside
- Too low → pale, undercooked biscuits
Skipping the Garlic Butter
Garlic butter isn’t optional—it’s what gives these bombs their signature flavor.
- Always brush after baking for best results
Overbaking
Leaving them in the oven too long dries out the biscuit.
- Remove once golden brown and just set
Quick Troubleshooting Guide
| Problem | Likely Cause | Fix |
| Cheese leaking out | Poor sealing | Pinch seams tighter |
| Dry texture | Overbaked | Reduce baking time |
| Pale tops | No butter or low heat | Brush butter, increase heat slightly |
| Doughy inside | Oven too cool | Bake longer or preheat properly |
Creative Variations of Pillsbury Biscuit Garlic Butter Cheese Bombs
Once you’ve mastered the base recipe, these variations keep things exciting and customizable.
Pepperoni Pizza-Style Cheese Bombs
Add a slice of pepperoni with mozzarella inside each biscuit.
- Serve with marinara sauce
- Sprinkle Italian seasoning on top
Spicy Jalapeño Cheese Bombs
Mix diced jalapeños with cheddar or mozzarella.
- Adds heat and bold flavor
- Great for game-day snacks
Herb & Parmesan Gourmet Version
Upgrade the flavor profile with:
- Fresh rosemary or thyme
- Generous parmesan topping
- Extra garlic butter glaze
This version pairs beautifully with pasta dishes or soups.
Sweet-Savory Twist
Turn them into a dessert-inspired snack:
- Fill with cream cheese and a touch of sugar
- Skip garlic, brush with butter + cinnamon sugar instead
Stuffed Combo Cheese Bombs
Blend two cheeses for a richer center:
- Mozzarella + cheddar
- Mozzarella + cream cheese
Tip: Mixing cheeses creates more complex flavor while maintaining melt quality.
Experimenting with these variations allows you to transform a simple Pillsbury biscuit garlic butter cheese bombs recipe into something new every time you make it.
Serving Ideas: When and How to Enjoy Cheese Bombs
Freshly baked Pillsbury biscuit garlic butter cheese bombs are best enjoyed warm, when the cheese is still melted and stretchy. Their rich, savory flavor makes them incredibly versatile.
Perfect Occasions
- Party appetizers: Easy finger food that disappears fast
- Game nights: Great alongside dips and drinks
- Family snacks: Quick treat everyone loves
- Side dish: Pairs well with hearty meals
Dipping Sauces That Elevate Flavor
- Marinara sauce: Classic pairing with a tangy contrast
- Ranch dressing: Creamy and cooling
- Garlic aioli: Extra richness for garlic lovers
- Spicy mayo: Adds a modern kick
Pairing with Meals
Serve these cheese bombs alongside:
- Pasta dishes like spaghetti or baked ziti
- Creamy soups such as tomato or potato soup
- Fresh salads to balance the richness
Tip: Serve immediately after brushing with garlic butter for the best taste and texture.
Make-Ahead, Storage, and Reheating Tips
Can You Make Them Ahead of Time?
Yes, you can assemble the cheese bombs in advance:
- Prepare and shape them
- Store covered in the refrigerator for up to 24 hours before baking
- Bake fresh when ready to serve
How to Store Leftovers
- Place cooled cheese bombs in an airtight container
- Store in the refrigerator for up to 3 days
Freezing Instructions
- Freeze baked or unbaked cheese bombs in a single layer
- Transfer to a freezer-safe bag once solid
- Store for up to 2 months
Tip: Freeze before baking for the freshest results later.
Best Ways to Reheat
- Oven (recommended): 350°F (175°C) for 5–8 minutes
- Air fryer: 320°F (160°C) for 3–5 minutes
- Microwave: 20–30 seconds (softens texture but less crispy)
Reheating in the oven helps restore that crispy outside and gooey inside.
Frequently Asked Questions About Pillsbury Biscuit Garlic Butter Cheese Bombs Recipe
Can I use homemade biscuit dough instead?
Yes, homemade dough works well. Keep the texture soft and slightly thick so it wraps easily around the cheese without tearing.
What’s the best way to keep cheese from leaking out?
Seal the dough tightly, avoid overfilling, and use cold cheese. Placing the seam side down also helps keep everything intact.
Can I cook these in an air fryer?
Absolutely. Cook at 320–350°F (160–175°C) for about 8–10 minutes. Check halfway through to ensure even browning.
How do I make them extra crispy on the outside?
Brush with butter before baking and again after baking. Baking slightly longer (without overdoing it) also adds crispness.
Can I make Pillsbury biscuit garlic butter cheese bombs ahead and freeze them?
Yes, freezing unbaked bombs is ideal. Bake directly from frozen, adding a few extra minutes to the cooking time.
What cheese melts best for this recipe?
Mozzarella is the top choice for stretch, but combining it with cheddar or Monterey Jack enhances flavor.
Final Thoughts: Why This Pillsbury Biscuit Garlic Butter Cheese Bombs Recipe Belongs in Your Rotation
Pillsbury biscuit garlic butter cheese bombs recipe delivers everything you want in a comfort snack—quick prep, simple ingredients, and unbeatable flavor. Each bite offers a perfect mix of buttery, garlicky goodness with a soft biscuit and melty cheese center.
Once you’ve made them once, it’s easy to customize with different cheeses, spices, or fillings to match your mood or occasion. They’re reliable, beginner-friendly, and always a hit whether served as a snack, appetizer, or side dish.
Try this recipe today, experiment with your favorite variations, and don’t forget to serve them warm for that irresistible cheesy pull. Save it for later, share it with friends, and make it your go-to comfort food classic.
