
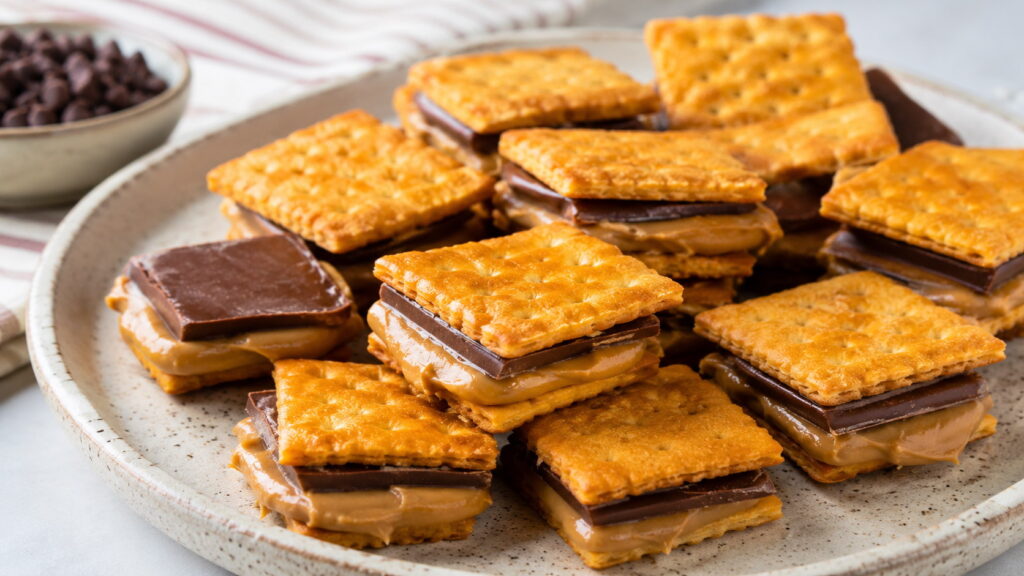
Sweet, salty, crunchy, and chocolatey, a simple recipe for Cheez It peanut butter and chocolate transforms an everyday cracker into an irresistible no-bake dessert. Whether you’re looking for a quick party snack, an easy holiday treat, or a fun recipe to make with kids, this combination delivers big flavor with very little effort.
Readers will learn exactly how to make the recipe successfully, choose the best ingredients, avoid common mistakes, customize the flavors, and store the finished treats so they stay crisp. Helpful tips throughout the guide explain why each ingredient matters, making the process simple even for first-time candy makers.
Recipe Snapshot
| Detail | Information |
| Prep Time | 20 minutes |
| Chill Time | 30 minutes |
| Total Time | 50 minutes |
| Difficulty | Easy |
| Servings | About 24 sandwich bites |
| Cooking Method | No-bake |
In This Article
Why You’ll Love This Simple Recipe for Cheez It Peanut Butter and Chocolate
Sweet desserts often benefit from a touch of salt, while savory snacks become even more satisfying with a little sweetness. Cheez-Its provide a crisp, cheesy base that balances rich peanut butter and smooth chocolate surprisingly well.
Several qualities make this recipe a favorite:
- Only a handful of ingredients are needed.
- No baking required, making preparation quick and convenient.
- Perfect balance of sweet and salty in every bite.
- Easy to customize with different chocolates and toppings.
- Great for parties, holidays, game nights, and edible gifts.
Crunchy crackers also create a satisfying contrast against the creamy peanut butter filling and the silky chocolate coating. Every bite delivers multiple textures without requiring advanced baking skills.
Another advantage is versatility. Small batches work well for family movie nights, while larger batches can easily feed a crowd. Since preparation is straightforward, younger helpers can participate with simple tasks like assembling cracker sandwiches or sprinkling toppings before the chocolate hardens.
What Is the Simple Recipe for Cheez It Peanut Butter and Chocolate?
Cheez It peanut butter and chocolate treats are bite-sized dessert sandwiches made by spreading peanut butter between two Cheez-It crackers, then dipping each sandwich in melted chocolate until completely coated.
Despite sounding unusual at first, the flavor combination follows the same principles that make chocolate-covered pretzels, peanut butter cups, and salted caramel desserts so popular.
Each ingredient contributes something important:
- Cheez-It crackers provide buttery crunch, cheese flavor, and salt.
- Peanut butter creates a creamy filling with nutty richness.
- Chocolate wraps everything together with sweetness and a smooth finish.
Finished treats resemble miniature candy bites with an addictive contrast between crunchy, creamy, salty, and sweet.
Popular occasions for making them include:
- Holiday cookie trays
- Birthday parties
- Bake sales
- Homemade gift boxes
- Potlucks
- After-school snacks
- Weekend movie nights
Because no oven is required, preparation remains simple throughout the year—even during warm months when turning on the oven isn’t appealing.
Ingredients You’ll Need for the Best Simple Recipe for Cheez It Peanut Butter and Chocolate
Quality ingredients make a noticeable difference in both flavor and texture. Choosing chocolate that melts smoothly and peanut butter with the right consistency helps produce neat, attractive treats.
Essential Ingredients
- 48 Cheez-It crackers (to make 24 sandwiches)
- ¾ cup creamy peanut butter
- 10–12 ounces semi-sweet chocolate chips or melting wafers
- 1 teaspoon coconut oil or neutral vegetable oil (optional, for smoother melting)
Optional Toppings
Personalize every batch with toppings such as:
- Crushed roasted peanuts
- Flaky sea salt
- Mini chocolate chips
- Colorful sprinkles
- Crushed pretzels
- Toasted coconut
- Finely chopped toffee pieces
Choosing the Best Chocolate
Chocolate affects both flavor and appearance.
| Chocolate Type | Flavor | Best Use |
| Milk chocolate | Sweet and creamy | Kid-friendly treats |
| Semi-sweet chocolate | Balanced sweetness | Everyday recipe |
| Dark chocolate | Rich and less sweet | Adults who enjoy deeper chocolate flavor |
| Melting wafers | Smooth finish | Professional-looking coating |
Melting wafers are often the easiest option because they harden with a glossy finish without requiring chocolate tempering.
Creamy vs. Crunchy Peanut Butter
Creamy peanut butter spreads evenly, making sandwich assembly easier.
Crunchy peanut butter adds another layer of texture, although larger peanut pieces may make dipping slightly more difficult.
Natural peanut butter can work, but thorough stirring is important before use because separated oil creates a thinner filling. Peanut butter with a stable consistency generally produces cleaner sandwich layers.
Ingredient Notes and Smart Substitutions
Several substitutions work well without changing the overall concept.
| Original Ingredient | Substitute | Result |
| Creamy peanut butter | Almond butter | Slightly sweeter, mild nut flavor |
| Peanut butter | Sunflower seed butter | Nut-free alternative |
| Semi-sweet chocolate | White chocolate | Sweeter finish |
| Semi-sweet chocolate | Dark chocolate | Richer flavor |
| Coconut oil | Vegetable shortening | Smooth chocolate coating |
Food allergy considerations are always important when serving homemade treats to guests. Current allergen guidance from Food Allergy Research & Education (FARE) can help identify common allergens and safe substitutions: https://www.foodallergy.org/
Kitchen Tools That Make Preparation Easy
Preparing a simple recipe for Cheez It peanut butter and chocolate doesn’t require specialized equipment, but a few basic kitchen tools will make the process faster and help create evenly coated treats.
Essential Equipment
Gather everything before you begin:
- Medium mixing bowl for melting chocolate
- Microwave or double boiler
- Offset spatula or butter knife for spreading peanut butter
- Fork or dipping tool for coating the sandwiches
- Parchment paper or silicone baking mat
- Baking sheet or large tray for chilling
- Measuring cups and spoons
- Small spoon or rubber spatula for stirring melted chocolate
Optional Tools for Professional-Looking Results
A few extras can improve both appearance and efficiency:
- Chocolate dipping fork for smoother coatings
- Cooling rack to let excess chocolate drip away
- Cookie scoop if adding decorative drizzles
- Kitchen scale for accurately measuring chocolate
Prep Before You Start
Spending a few minutes organizing ingredients helps everything go smoothly.
- Line a tray with parchment paper before melting the chocolate.
- Measure toppings into small bowls so they’re ready to sprinkle immediately.
- Pair up the Cheez-It crackers to make assembly quicker.
- Leave enough counter space for dipping and decorating.
Tip: Chocolate begins to set quickly, especially in a cool kitchen. Having toppings within reach prevents delays that could keep decorations from sticking.
How to Make Simple Recipe for Cheez It Peanut Butter and Chocolate Step by Step
Creating these sweet-and-salty bites is straightforward. Working in stages keeps the chocolate smooth and the cracker sandwiches intact.
Prepare the Cheez-It Sandwiches
- Arrange half of the Cheez-It crackers with the flat side facing up.
- Spread about 1 teaspoon of creamy peanut butter onto each cracker.
- Top with another cracker, gently pressing until the filling reaches the edges without overflowing.
- Place the assembled sandwiches on the prepared tray.
Avoid overfilling. Too much peanut butter can squeeze out during dipping and make the chocolate coating uneven.
Melt the Chocolate Correctly
Microwave Method
- Place chocolate chips or melting wafers in a microwave-safe bowl.
- Add 1 teaspoon coconut oil if using.
- Heat in 20-second intervals, stirring thoroughly after each round.
- Continue until almost completely melted, then stir until smooth.
Double Boiler Method
- Fill a saucepan with about an inch of water and bring to a gentle simmer.
- Place a heatproof bowl over the pan without letting the bottom touch the water.
- Stir continuously until the chocolate becomes silky and fully melted.
Never allow water to come into contact with melted chocolate, as even a small amount can cause it to seize.
Coat Each Sandwich Evenly
- Drop one cracker sandwich into the melted chocolate.
- Use a fork or dipping tool to turn until completely coated.
- Lift the sandwich and gently tap the fork against the bowl to remove excess chocolate.
- Slide the coated treat onto the parchment-lined tray.
Working with one sandwich at a time keeps the coating smooth and prevents the crackers from becoming soft.
Add Toppings Before the Chocolate Sets
Decorate each coated sandwich immediately while the chocolate is still glossy.
Popular finishing touches include:
- Chopped peanuts
- Flaky sea salt
- Mini chocolate chips
- Holiday sprinkles
- Crushed pretzels
- Toasted coconut
Less is more. A light sprinkle enhances flavor without overpowering the chocolate coating.
Chill Until Firm
Transfer the tray to the refrigerator for 30 minutes, or until the chocolate feels firm to the touch.
Texture cues to look for:
- Chocolate has a matte or lightly glossy finish.
- Coating doesn’t stick when gently touched.
- Crackers remain crisp when bitten.
- Peanut butter stays creamy inside.
Once chilled, the treats are ready to serve or store.
Expert Tips for Perfect Sweet-and-Salty Results Every Time
Small adjustments can make the difference between good treats and irresistible ones.
Keep the Crackers Crisp
Moisture is the biggest enemy of crunchy crackers.
- Assemble the sandwiches shortly before dipping.
- Let the chocolate cool slightly before coating so excessive heat doesn’t soften the crackers.
- Store finished treats in an airtight container once fully set.
Use Chocolate at the Right Consistency
Chocolate that’s too thick creates heavy coatings, while overly hot chocolate can become runny.
Ideal texture: Smooth enough to flow slowly from a spoon without appearing watery.
If the chocolate thickens while working:
- Microwave for 10–15 seconds, then stir well.
- Add ½ teaspoon coconut oil if needed to restore a silky consistency.
Balance the Peanut Butter Filling
Too much filling can cause sandwiches to slide apart.
A thin, even layer produces:
- Better structure
- Cleaner edges
- Easier dipping
- Balanced flavor in every bite
Work in Small Batches
Rather than assembling dozens at once, prepare 8 to 12 sandwiches before dipping. Smaller batches help maintain crisp crackers and prevent chocolate from cooling too much.
Decorate Immediately
Chocolate hardens faster than many people expect. Sprinkle toppings within seconds of placing each coated sandwich on the tray.
Choose High-Quality Chocolate
Good chocolate melts more smoothly and delivers richer flavor.
Look for products with cocoa butter listed among the primary ingredients rather than relying heavily on vegetable oils.
Expert takeaway: Simple ingredients shine in a recipe like this, so using flavorful chocolate and a peanut butter you genuinely enjoy makes a noticeable difference in the finished treats.
Delicious Variations to Customize Your Cheez It Peanut Butter and Chocolate Treats
One of the best things about a simple recipe for Cheez It peanut butter and chocolate is how easy it is to customize. Small ingredient swaps can completely change the flavor while keeping the same sweet-and-salty appeal.
White Chocolate Celebration Bites
White chocolate creates a sweeter dessert with a creamy finish.
Try adding:
- Rainbow sprinkles
- Freeze-dried strawberry pieces
- Crushed peppermint candies during the holidays
- Lemon zest for a bright twist
Dark Chocolate Lovers’ Version
Dark chocolate balances the salty crackers with a richer, less sweet coating.
Best toppings include:
- Flaky sea salt
- Toasted almonds
- Cocoa nibs
- Finely chopped pistachios
Peanut Butter and Marshmallow Filling
Mix equal parts creamy peanut butter and marshmallow creme for a fluffier center.
Resulting treats resemble classic fluffernutter sandwiches with an extra crunchy bite.
Caramel Drizzle Deluxe
Allow the chocolate coating to harden completely before finishing with a thin drizzle of caramel sauce.
A sprinkle of flaky sea salt turns each bite into a dessert inspired by salted caramel candy.
Holiday-Themed Treats
Decorations can match nearly any celebration.
| Occasion | Decoration Ideas |
| Christmas | Red and green sprinkles, crushed candy canes |
| Halloween | Orange and black sprinkles, candy eyes |
| Valentine’s Day | Pink drizzle, heart-shaped sprinkles |
| Easter | Pastel candy pearls, colorful sugar |
| Birthday Parties | Rainbow nonpareils and edible glitter |
Nut-Free Alternatives
Peanut allergies don’t have to keep anyone from enjoying similar flavors.
Replace peanut butter with:
- Sunflower seed butter
- Cookie butter
- Soy nut butter, if appropriate for your guests
Always check ingredient labels carefully when preparing treats for someone with food allergies.
Common Mistakes to Avoid When Making Cheez It Peanut Butter and Chocolate
Simple recipes can still have a few pitfalls. Paying attention to a handful of details helps ensure every batch comes out crisp, smooth, and delicious.
| Mistake | What Happens | How to Prevent It |
| Overheating chocolate | Thick, grainy, or scorched chocolate | Melt slowly using short intervals and stir frequently |
| Adding too much peanut butter | Filling squeezes out during dipping | Spread a thin, even layer |
| Skipping the chilling step | Chocolate stays soft and smudges easily | Chill for at least 30 minutes before serving |
| Letting water touch the chocolate | Chocolate seizes and becomes unusable | Keep bowls and utensils completely dry |
| Leaving treats uncovered | Crackers lose their crunch | Store in an airtight container |
| Using very cold peanut butter | Filling spreads unevenly | Let peanut butter sit at room temperature for 15–20 minutes |
Watch the Chocolate Temperature
Chocolate should be warm enough to coat smoothly without becoming overly thin.
Good signs:
- Flows slowly from a spoon
- Looks glossy
- Covers the crackers evenly
Chocolate that becomes extremely hot may develop a dull finish after cooling.
Don’t Rush Assembly
Taking a few extra moments to build neat cracker sandwiches makes dipping much easier.
Even layers of peanut butter help the sandwiches stay together while coating them in chocolate.
Give the Chocolate Time to Set
Moving the treats before the coating hardens can leave fingerprints, smudges, or uneven bottoms.
Patience pays off with cleaner-looking desserts that are easier to package for gifts or parties.
Serving Ideas for Parties, Gifts, and Everyday Snacking
Cheez It peanut butter and chocolate bites are versatile enough for everything from casual gatherings to festive celebrations.
Build a Dessert Platter
Arrange the finished treats alongside a variety of sweet snacks for an eye-catching dessert board.
Great pairings include:
- Chocolate-covered pretzels
- Fresh strawberries
- Brownie bites
- Mini peanut butter cups
- Vanilla wafers
- Caramel popcorn
Combining different textures keeps every bite interesting.
Pack Them Into Lunchboxes
Because the treats are individually sized, they fit easily into lunchboxes or snack containers.
Tip: Pack them with an ice pack during warm weather to help prevent the chocolate from softening.
Serve During Movie Night
A bowl of these crunchy treats pairs perfectly with cozy evenings at home.
Balance the sweetness by serving alongside:
- Buttered popcorn
- Salted mixed nuts
- Pretzel sticks
Create Homemade Edible Gifts
Place several treats in decorative cellophane bags or small gift boxes tied with ribbon.
Include a handwritten tag with the flavor variation, such as:
- Semi-Sweet Chocolate
- Dark Chocolate Sea Salt
- White Chocolate Sprinkle
- Peanut Butter Marshmallow
Homemade gifts are especially popular during the holiday season because they look impressive while requiring very little preparation.
Beverage Pairings
Rich chocolate and peanut butter pair well with several beverages.
| Beverage | Why It Works |
| Cold milk | Classic pairing that balances the rich chocolate |
| Hot coffee | Bitter notes complement the sweetness |
| Hot chocolate | Creates an indulgent dessert experience |
| Chai tea | Warm spices contrast beautifully with peanut butter |
| Black tea | Cleanses the palate between bites |
Whether served on a holiday dessert table or enjoyed as an afternoon snack, these bite-sized treats offer an irresistible balance of creamy, crunchy, sweet, and salty flavors that guests are likely to reach for again and again.
How to Store, Freeze, and Keep Them Fresh
Proper storage helps preserve the crisp texture of the Cheez-It crackers and the smooth chocolate coating. Since moisture is the biggest threat to crunchy snacks, keeping air and humidity away from the finished treats is essential.
Room Temperature Storage
A cool, dry kitchen works well if you plan to enjoy the treats within a few days.
- Store in an airtight container.
- Place sheets of parchment paper between layers to prevent sticking.
- Keep away from direct sunlight or warm appliances.
Shelf life: Up to 3 days at room temperature (below 70°F/21°C).
Refrigeration
Refrigeration extends freshness and keeps the chocolate firm.
- Arrange treats in a single layer or separate layers with parchment paper.
- Seal the container tightly to prevent moisture and refrigerator odors from affecting the flavor.
Shelf life: Up to 2 weeks in the refrigerator.
Before serving, let the treats sit at room temperature for 10–15 minutes. Slight warming softens the peanut butter filling while maintaining the crackers’ crunch.
Freezing Instructions
Freezing works surprisingly well for longer storage.
- Arrange the chocolate-coated bites on a baking sheet until completely frozen.
- Transfer them to a freezer-safe airtight container or zip-top freezer bag.
- Separate layers with parchment paper to avoid sticking.
Freezer life: Up to 2 months.
How to Thaw
Move the desired number of treats from the freezer to the refrigerator for several hours or overnight.
Once thawed, allow them to rest at room temperature for about 15 minutes before serving.
Gradual thawing helps reduce condensation, which can soften the crackers.
Nutrition Overview and Ingredient Substitution Ideas
Nutritional values vary depending on the brand of crackers, peanut butter, chocolate, and toppings used. The following estimates are based on one finished sandwich bite made with semi-sweet chocolate and creamy peanut butter.
Estimated Nutrition Per Serving (1 Bite)
| Nutrient | Approximate Amount |
| Calories | 110 |
| Total Fat | 7 g |
| Saturated Fat | 2.5 g |
| Carbohydrates | 10 g |
| Sugar | 6 g |
| Protein | 2 g |
| Sodium | 95 mg |
| Fiber | 1 g |
Ingredient Substitutions
Small substitutions can accommodate dietary preferences while maintaining the sweet-and-salty character of the recipe.
| Ingredient | Substitute | Notes |
| Peanut butter | Almond butter | Mild, slightly sweeter flavor |
| Peanut butter | Cashew butter | Extra creamy texture |
| Peanut butter | Sunflower seed butter | Nut-free alternative |
| Semi-sweet chocolate | Dark chocolate | Less sweet, richer cocoa flavor |
| Semi-sweet chocolate | White chocolate | Sweeter and creamier |
| Cheez-It crackers | Gluten-free cheese crackers | Suitable for gluten-sensitive guests if certified gluten-free |
Lower-Sugar Ideas
Reducing sweetness is easy without sacrificing flavor.
- Choose 70% dark chocolate instead of milk chocolate.
- Select a no-added-sugar peanut butter.
- Skip sugary sprinkles in favor of chopped roasted nuts or toasted coconut.
- Use toppings sparingly to let the sweet-and-salty contrast shine.
Frequently Asked Questions About the Simple Recipe for Cheez It Peanut Butter and Chocolate
Can I make Cheez It peanut butter and chocolate treats ahead of time?
Yes. Preparing them one or two days before serving actually works well because the chocolate has plenty of time to firm up. Store the finished treats in an airtight container in the refrigerator until you’re ready to serve.
Which chocolate melts best for coating the crackers?
Melting wafers provide the smoothest and easiest coating, while good-quality semi-sweet chocolate chips produce excellent flavor. Dark and milk chocolate are also great choices depending on your sweetness preference.
Can I use natural peanut butter?
Yes, but stir natural peanut butter thoroughly before using. Excess oil can make the filling too soft and more difficult to spread evenly.
How do I keep the crackers crunchy?
Avoid exposing the treats to humidity, allow the chocolate to cool before coating, and store everything in an airtight container. Refrigeration also helps maintain crispness for longer.
Can I freeze the finished treats?
Absolutely. Freeze them in a sealed freezer-safe container for up to two months. Thaw gradually in the refrigerator before serving for the best texture.
What other fillings work besides peanut butter?
Almond butter, cookie butter, sunflower seed butter, marshmallow creme, chocolate hazelnut spread, or a peanut butter and honey mixture all make delicious alternatives.
Can I package these as homemade gifts?
Yes. Wait until the chocolate is completely firm before placing the treats in decorative boxes, tins, or cellophane bags. Separating layers with parchment paper keeps the coating looking neat during transport.
Ready to make your own simple recipe for Cheez It peanut butter and chocolate? Gather a few pantry staples, experiment with your favorite chocolate and toppings, and enjoy the irresistible combination of creamy, crunchy, sweet, and salty flavors. If you try one of the variations or create your own twist, share the recipe with friends, save it for your next celebration, and keep the idea handy whenever you need an easy no-bake dessert everyone will remember.
