
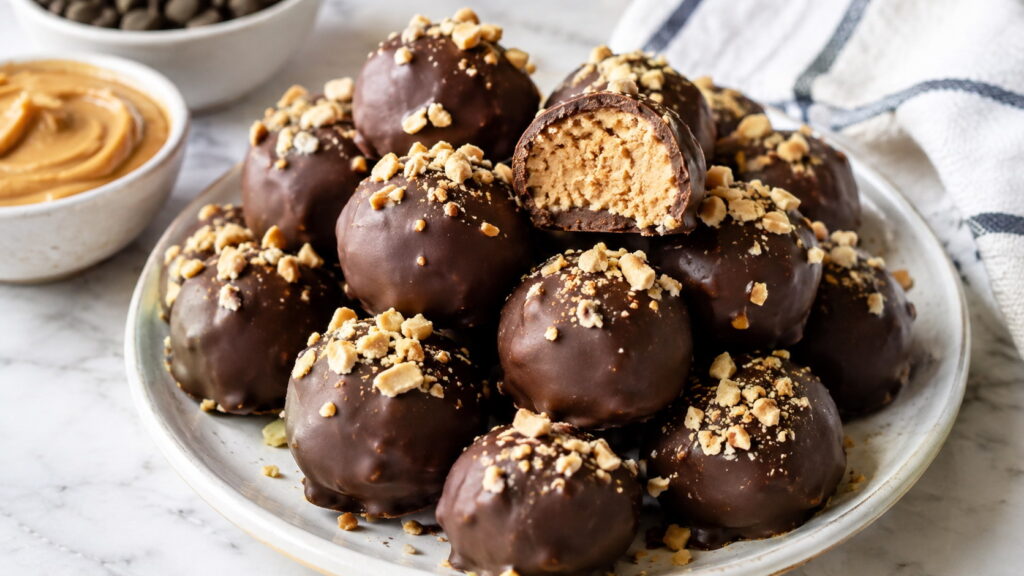
Craving a rich, chocolatey treat without turning on the oven? This gluten free chocolate peanut butter balls recipe combines creamy peanut butter, sweet powdered sugar, and a smooth chocolate coating to create an easy no-bake dessert with a satisfying contrast of textures.
The recipe comes together with simple ingredients and only a few basic kitchen tools. You’ll learn how to make a firm but creamy peanut butter center, coat the balls neatly in chocolate, keep the recipe safely gluten-free, troubleshoot common texture problems, and store or freeze the finished treats. A few easy variations also make the recipe flexible enough for holidays, parties, homemade gifts, or everyday snacking.
In This Article
Gluten Free Chocolate Peanut Butter Balls Recipe: A No-Bake Treat Everyone Will Love
Chocolate and peanut butter are a classic combination for good reason. The slightly salty, creamy peanut butter filling balances the sweetness of the chocolate coating, while powdered sugar gives the center enough structure to hold its shape.
No baking means the preparation is especially convenient. Once the peanut butter mixture is combined and chilled, the balls can be rolled, dipped in melted chocolate, and refrigerated until firm.
Recipe at a Glance
| Detail | Information |
| Prep time | About 25 minutes |
| Chilling time | About 30–45 minutes |
| Chocolate setting time | About 20–30 minutes |
| Total time | About 1 hour 15 minutes |
| Yield | About 24 balls |
| Difficulty | Easy |
| Method | No-bake |
The exact yield depends on how large you roll the peanut butter centers. Keeping each portion around 1 tablespoon creates bite-sized treats that are easy to coat and serve.
What You’ll Need
A few everyday tools are enough:
- Large mixing bowl
- Electric mixer or sturdy wooden spoon
- Measuring cups and spoons
- Baking sheet or large plate
- Parchment paper
- Microwave-safe bowl or double boiler for melting chocolate
- Fork, dipping tool, or toothpick for coating
Keep the finished balls chilled until the chocolate has completely set. A short refrigeration period also helps the centers stay firm while you dip them.
Why the No-Bake Method Works So Well
The peanut butter mixture does not need flour, eggs, or a traditional baking step. Powdered sugar absorbs some of the moisture from the peanut butter and butter, creating a moldable mixture that can be shaped by hand.
Chilling provides another important advantage. Cold centers are easier to handle and less likely to soften immediately when they touch warm melted chocolate.
For a recipe requiring strict gluten-free preparation, ingredient labels matter just as much as the basic ingredient list. The FDA’s gluten and food labeling guidance is a useful reference for understanding gluten-free labeling.
What Makes These Chocolate Peanut Butter Balls Gluten-Free?
The core ingredients used in chocolate peanut butter balls are naturally free from wheat, barley, and rye. The finished dessert is only as gluten-free as the ingredients and preparation practices used, though, so packaged products deserve a careful label check.
Watch the Ingredients That Can Hide Gluten
Peanut butter is generally gluten-free, but flavored or specialty products can contain additional ingredients. Chocolate can also vary by brand, particularly when using filled, flavored, or specialty chocolate products.
Check the labels on:
- Peanut butter: Choose a product without gluten-containing additives.
- Powdered sugar: Verify the product label if strict gluten avoidance is necessary.
- Chocolate: Look for a gluten-free statement when required for dietary safety.
- Vanilla extract: Plain vanilla extract is generally suitable, but flavored blends should be checked.
- Sprinkles and toppings: Specialty decorations can contain wheat-based ingredients.
- Butter or dairy-free alternatives: Check flavored or processed varieties for added ingredients.
Gluten-Free vs. Certified Gluten-Free
A recipe can contain no obvious gluten ingredients without every packaged ingredient being certified gluten-free. Readers with celiac disease or a medically necessary gluten-free diet may prefer products carrying a clear gluten-free label.
Cross-contact also matters. Shared measuring cups, bowls, utensils, cutting boards, or surfaces that have previously contacted wheat-containing foods can introduce gluten into an otherwise suitable recipe.
Using clean equipment and dedicated gluten-free ingredients provides an extra level of care when preparing these treats for someone who must strictly avoid gluten.
Ingredients You’ll Need for Gluten Free Chocolate Peanut Butter Balls
The ingredient list is short, but each component has a specific job. Getting the proportions right makes the difference between a center that rolls smoothly and one that falls apart or becomes overly sticky.
For the Peanut Butter Filling
- 1 cup creamy peanut butter
- ½ cup unsalted butter, softened
- 2 cups powdered sugar
- 1 teaspoon vanilla extract
Creamy peanut butter creates the smoothest filling and makes shaping easier. Regular conventional peanut butter tends to produce a more predictable consistency than very loose natural peanut butter.
Softened butter helps the ingredients blend evenly. Avoid melting the butter completely because excess liquid can make the mixture too soft.
Powdered sugar provides sweetness while also giving the peanut butter mixture structure. Granulated sugar is not a good direct replacement because its larger crystals can leave the filling gritty.
Vanilla extract rounds out the peanut butter flavor without making the dessert taste strongly of vanilla.
For the Chocolate Coating
- 2 cups gluten-free chocolate chips or chocolate melting wafers
- 1 teaspoon shortening or coconut oil, optional
Semi-sweet chocolate gives the balls a balanced flavor, while milk chocolate creates a sweeter, creamier result. Dark chocolate works particularly well if you prefer a less-sweet coating.
A small amount of shortening or coconut oil can help create a thinner, smoother coating when using chocolate chips. Add only a small amount; too much fat can prevent the coating from setting properly.
Optional Toppings
Decorations can be added while the chocolate is still wet:
- Finely chopped peanuts
- Flaky sea salt
- Gluten-free sprinkles
- Finely shredded coconut
- Crushed gluten-free cookies
Choose toppings according to the occasion, but always check packaged toppings carefully when gluten-free preparation is important.
Ingredient Selection Tip
The best peanut butter for gluten free chocolate peanut butter balls is one with a thick, spreadable consistency. Extremely runny natural peanut butter can make the filling difficult to shape.
If using natural peanut butter, stir the jar thoroughly before measuring so the peanut butter and oil are evenly incorporated. You may need a little additional powdered sugar to achieve a firm, rollable texture.
How to Make Gluten Free Chocolate Peanut Butter Balls From Scratch
Making gluten free chocolate peanut butter balls is mostly about getting the filling to the right consistency before adding the chocolate. A firm, chilled center rolls easily and stays intact during dipping, while a smooth coating gives the finished treats a polished candy-shop appearance.
Prepare the Peanut Butter Mixture
- Soften the butter. Let the unsalted butter sit at room temperature until easily pressed with a spoon. Soft butter blends much more evenly than cold butter.
- Combine the peanut butter and butter. Add both to a large mixing bowl and beat until smooth and creamy.
- Add powdered sugar gradually. Mix in the powdered sugar in several additions rather than adding everything at once. Scrape down the sides of the bowl as needed.
- Add vanilla. Mix in the vanilla extract until evenly incorporated.
- Check the consistency. The finished mixture should be soft enough to roll but firm enough to hold a ball shape. If the mixture feels unusually sticky, add powdered sugar 1 tablespoon at a time.
- Chill the filling. Cover the bowl and refrigerate for about 20–30 minutes. Chilling makes the mixture noticeably easier to handle.
Shape the Peanut Butter Balls
Line a baking sheet or large plate with parchment paper.
Scoop approximately 1 tablespoon of filling per ball, then roll each portion gently between your palms. Aim for a smooth, compact shape rather than pressing the filling too firmly.
Place the finished balls on the parchment-lined surface and refrigerate them for another 10–15 minutes if they feel soft.
Consistent sizing matters. Balls of similar size chill and coat at roughly the same rate, making the entire batch easier to finish.
Melt the Chocolate
Place the gluten-free chocolate chips or melting wafers in a microwave-safe bowl. Microwave in 15–20 second intervals, stirring thoroughly after each interval.
Continue until the chocolate is mostly melted. Keep stirring after removing the bowl from the microwave because residual heat will often melt the remaining pieces.
A double boiler also works well. Place the chocolate in a heatproof bowl over gently simmering water, making sure the bottom of the bowl does not touch the water.
Never allow water or steam to get into the chocolate. Even a small amount can cause melted chocolate to seize and become thick and grainy.
Coat the Peanut Butter Balls
Remove a few chilled peanut butter balls at a time, keeping the rest refrigerated.
Drop one ball into the melted chocolate and turn it gently with a fork until completely coated. Lift the ball with the fork and tap the fork lightly against the edge of the bowl to allow excess chocolate to drip away.
Transfer the coated ball to the parchment paper.
Add chopped peanuts, flaky sea salt, coconut, or gluten-free sprinkles before the chocolate sets if desired.
Refrigerate the completed batch for approximately 20–30 minutes, or until the chocolate coating feels firm.
The Trick to Getting the Peanut Butter Center Just Right
The filling is the heart of the recipe, so texture deserves special attention. A successful center should feel similar to soft cookie dough: pliable, smooth, and easy to shape without sticking excessively to your hands.
If the Mixture Is Too Sticky
Sticky filling usually means the mixture contains more moisture or fat than needed for easy shaping.
Add powdered sugar 1 tablespoon at a time, mixing thoroughly after each addition. Stop once the filling becomes firm enough to roll.
Avoid adding a large amount of powdered sugar at once. Too much can make the center dry, overly sweet, and crumbly.
If the Mixture Is Too Dry or Crumbly
A crumbly center needs a little additional moisture or fat.
Mix in 1 teaspoon of peanut butter at a time until the mixture comes together. Allow a few seconds of mixing between additions so you can judge the texture accurately.
Room-temperature peanut butter generally incorporates more easily than refrigerated peanut butter.
Why Chilling Makes Such a Difference
Warm peanut butter filling becomes soft quickly, especially when handled repeatedly. Refrigeration firms the butter and peanut butter, making the balls easier to shape and helping them maintain their form during chocolate dipping.
Chill the centers before coating rather than trying to work with soft filling. The extra few minutes can make the dipping process significantly cleaner.
How to Get Uniform Peanut Butter Balls
Use a small cookie scoop or tablespoon measure for consistent portions. Roll each portion gently until the surface looks smooth.
Uniform balls provide several benefits:
- More even chocolate coverage
- Consistent serving sizes
- Similar chilling times
- A neater appearance on dessert trays
- Easier storage in containers
Avoid making the centers excessively large. Smaller, bite-sized balls are easier to dip and provide a better balance between peanut butter filling and chocolate coating.
Chocolate Coating Tips for Smooth, Professional-Looking Peanut Butter Balls
A glossy, even chocolate shell makes homemade peanut butter balls look far more polished. Careful temperature control and gentle handling are more important than specialized candy-making equipment.
Choose the Right Chocolate
Melting wafers are usually the easiest option for a smooth coating. Chocolate chips also work well and are convenient, especially when you already have them in the pantry.
Semi-sweet chocolate offers a balanced contrast to the sweet filling. Milk chocolate produces a sweeter candy, while dark chocolate creates a richer flavor with less perceived sweetness.
Always verify that the chocolate you choose meets your gluten-free requirements.
Melt Slowly Rather Than Quickly
High heat can scorch chocolate or cause the mixture to become thick and difficult to work with.
Microwave chocolate in short intervals, stirring between each one. The chocolate should become smooth and fluid rather than extremely hot.
Gentle heat is the secret to easier dipping.
Keep the Centers Cold
Work with a small portion of the chilled peanut butter balls at a time. Cold centers are firmer and less likely to break apart when moved through the melted chocolate.
If the balls begin feeling soft while you work, return the tray to the refrigerator for several minutes before continuing.
Avoid Excess Chocolate
A thick layer of chocolate can overwhelm the peanut butter filling and make the finished balls unnecessarily heavy.
After dipping, lift each ball with a fork and let the excess coating drip back into the bowl. A gentle tap against the bowl can remove additional chocolate without damaging the coating.
Place each piece carefully onto parchment paper rather than sliding it off the fork.
Create a Clean Finish
For a neat appearance, allow the chocolate to drip away before transferring the ball to parchment. A small chocolate “foot” may form underneath as the coating settles, which can easily be left as part of the homemade look or trimmed away after the chocolate firms.
Add toppings immediately after dipping. Chopped peanuts and sea salt will stick beautifully to wet chocolate but will not adhere once the shell has hardened.
Refrigerate the finished gluten free chocolate peanut butter balls until the coating is completely firm, then transfer them to an airtight container.
Gluten Free Chocolate Peanut Butter Balls: Easy Substitutions and Variations
The basic recipe is wonderfully flexible, so you can adjust the filling or chocolate coating without losing the signature peanut butter-and-chocolate combination. Keep the consistency of the filling as the priority whenever changing ingredients.
Use Natural Peanut Butter
Natural peanut butter can work, but the texture may be softer because of the separated oil. Stir the peanut butter thoroughly before measuring so the oil and solids are evenly combined.
If the filling seems too loose after mixing, add powdered sugar gradually until the mixture becomes firm enough to roll.
Make Dairy-Free Peanut Butter Balls
Replace the butter with a dairy-free butter alternative that has a similar solid consistency. Choose dairy-free chocolate for the coating.
Check every packaged ingredient for gluten-free labeling when preparing the treats for someone with celiac disease or a medically necessary gluten-free diet.
Try Other Nut Butters
Peanut butter can be replaced with almond butter or cashew butter for a different flavor.
Almond butter generally creates a slightly nuttier, less sweet center. Cashew butter tends to produce a mild and creamy filling.
Nut butters vary considerably in thickness, so add powdered sugar gradually rather than automatically following the same amount.
Change the Chocolate Coating
Different chocolate choices can completely change the character of the dessert:
| Chocolate | Flavor Result |
| Semi-sweet | Balanced and classic |
| Milk chocolate | Sweeter and creamier |
| Dark chocolate | Richer and less sweet |
| White chocolate | Very sweet and creamy |
Choose gluten-free chocolate appropriate for your dietary needs rather than assuming every variety from a particular brand has the same formulation.
Add Simple Finishing Touches
Small toppings can make the balls feel more special without complicating the recipe.
Try:
- Finely chopped roasted peanuts
- Flaky sea salt
- Unsweetened shredded coconut
- Gluten-free sprinkles
- Finely crushed gluten-free cookies
Add toppings while the chocolate is still wet so they adhere securely to the coating.
Common Mistakes That Can Ruin Chocolate Peanut Butter Balls
Chocolate peanut butter balls require very little cooking, but a few small mistakes can affect the texture or appearance. Knowing what to watch for makes the process much more reliable.
Using Peanut Butter That Is Too Runny
Very loose peanut butter can leave the filling soft and difficult to shape. Natural peanut butter with a large amount of separated oil is especially prone to causing problems.
Solution: Stir natural peanut butter thoroughly before measuring, then adjust the filling with powdered sugar if necessary.
Adding Too Much Powdered Sugar
More powdered sugar does not always mean a better filling. Excess sugar can produce a dry center that cracks while rolling.
Solution: Add powdered sugar gradually and stop once the mixture becomes smooth, firm, and moldable.
Skipping the Chilling Step
Soft peanut butter centers are harder to dip and may break apart when moved through melted chocolate.
Solution: Refrigerate the shaped balls before coating. Return the tray to the refrigerator whenever the centers become noticeably soft.
Overheating the Chocolate
Chocolate exposed to excessive heat can become thick, dull, scorched, or difficult to spread.
Solution: Use short microwave intervals and stir frequently. Residual heat will continue melting the chocolate even after the bowl leaves the microwave.
Getting Water Into the Chocolate
Water can cause melted chocolate to seize, turning a smooth coating into a thick, grainy mixture.
Solution: Keep the bowl, utensils, and work area completely dry while melting and dipping.
Making the Balls Too Large
Oversized centers require more chocolate and can become awkward to dip. The finished candy may also feel overly rich in a single bite.
Solution: Use roughly 1 tablespoon of filling per ball for a convenient bite-sized treat.
Forgetting to Check Labels
A recipe made from naturally gluten-free ingredients can still be unsuitable when a packaged ingredient contains gluten or has an unexpected source of cross-contact.
Solution: Read labels on chocolate, peanut butter, toppings, and other packaged ingredients, especially when serving someone who needs strict gluten-free food.
How to Store Gluten Free Chocolate Peanut Butter Balls
Proper storage keeps the peanut butter center creamy while protecting the chocolate coating from moisture, odors, and temperature fluctuations.
Refrigerating the Finished Balls
Place the finished treats in an airtight container with parchment paper between layers if stacking is necessary.
Refrigerated chocolate peanut butter balls generally keep well for about 1–2 weeks when properly sealed. Allowing the container to remain closed while the treats warm slightly can help reduce condensation on the chocolate.
For the best texture, let individual balls sit at room temperature for a few minutes before serving.
Freezing Chocolate Peanut Butter Balls
Freezing works especially well when you want to prepare the dessert ahead of a holiday, party, or gathering.
Arrange the chocolate-coated balls in a single layer on a parchment-lined tray and freeze until firm. Transfer the frozen treats to an airtight freezer-safe container or bag, separating layers with parchment paper.
Use the best-quality airtight packaging possible to protect the chocolate from freezer odors and moisture.
The balls can generally be frozen for up to 2–3 months for good quality.
How to Thaw Frozen Peanut Butter Balls
Move the desired number of balls from the freezer to the refrigerator and let them thaw gradually.
Once thawed, allow them to sit briefly at room temperature before serving.
Avoid repeatedly freezing and thawing the entire batch. Portioning the treats before freezing makes it easier to take out only what you need.
Can You Make Them Ahead?
Absolutely. Gluten free chocolate peanut butter balls are an excellent make-ahead dessert.
Prepare the complete batch, allow the chocolate coating to become firm, then store the treats in an airtight container in the refrigerator. Preparing them a day or two before serving can actually make entertaining easier because the dessert is ready to place on a tray when guests arrive.
For longer-term planning, freeze the finished balls and thaw only the amount needed.
When to Serve These Chocolate Peanut Butter Balls
These gluten free chocolate peanut butter balls are easy enough for everyday snacking but special enough for holiday dessert tables and homemade gifts. Their small size also makes them convenient when you want a sweet bite without preparing an entire cake or batch of cookies.
Holiday Dessert Trays
Arrange the chocolate-covered balls alongside other gluten-free treats for Christmas gatherings, Thanksgiving desserts, or cookie exchanges. A sprinkle of flaky sea salt or chopped peanuts gives the finished candies an attractive homemade appearance.
Parties and Gatherings
Bite-sized desserts are particularly convenient for buffets and parties because guests can grab one without needing plates or utensils.
Keep the balls refrigerated until shortly before serving, especially in a warm room.
Homemade Edible Gifts
Place chilled peanut butter balls in small food-safe boxes or tins lined with parchment paper. Keep the treats cool during transport so the chocolate coating remains firm.
When gifting to someone who requires a strict gluten-free diet, clearly identify the ingredients and consider whether the treats were prepared in a kitchen where gluten-containing foods are also handled.
After-Dinner Treats
Serve one or two balls with coffee, tea, or a glass of cold milk. The combination of creamy peanut butter and chocolate makes a satisfying finish to a meal without requiring a large dessert portion.
Gluten Free Chocolate Peanut Butter Balls Recipe FAQs
Are chocolate peanut butter balls naturally gluten-free?
The basic ingredients can be gluten-free, but packaged chocolate, peanut butter, sprinkles, and other ingredients should be checked carefully. Anyone with celiac disease or a medically necessary gluten-free diet should also consider cross-contact during preparation.
What peanut butter is best for this recipe?
Creamy peanut butter with a thick, spreadable consistency is generally easiest to work with. Natural peanut butter can also be used, but thorough stirring is important because separated oil may make the filling softer.
Can I use natural peanut butter for gluten free chocolate peanut butter balls?
Yes. Stir the peanut butter thoroughly before measuring. If the finished mixture is too soft to roll, gradually add powdered sugar until the desired firm, moldable texture develops.
Can I make these peanut butter balls dairy-free?
Yes. Replace the butter with a suitable dairy-free butter alternative and use dairy-free chocolate. Check all packaged ingredients to ensure they meet your gluten-free requirements as well.
Can I use almond butter instead of peanut butter?
Yes. Almond butter makes a delicious variation, although the consistency can differ from peanut butter. Add powdered sugar gradually and adjust according to the texture of the mixture.
Why is my peanut butter ball mixture too sticky?
Excess moisture or oil can make the filling difficult to shape. Refrigerate the mixture first, then add powdered sugar 1 tablespoon at a time if the filling remains too soft.
Why is my peanut butter filling crumbly?
Too much powdered sugar can create a dry filling. Add a small amount of peanut butter, about 1 teaspoon at a time, and mix until the filling becomes cohesive and easy to roll.
How long does it take to make gluten free chocolate peanut butter balls?
Plan on roughly 25 minutes for preparation, followed by 30–45 minutes of chilling and about 20–30 minutes for the chocolate coating to set. The exact time depends on how quickly the balls are shaped and dipped.
Can I freeze chocolate peanut butter balls?
Yes. Freeze the finished balls in an airtight freezer-safe container with parchment between layers. For the best quality, enjoy them within about 2–3 months.
How should I store chocolate peanut butter balls?
Store the finished treats in an airtight container in the refrigerator for approximately 1–2 weeks. Separate layers with parchment paper when stacking to prevent the chocolate coating from sticking.
Can I make gluten free chocolate peanut butter balls ahead of time?
Yes. Preparing them a day or two before serving works especially well. Keep the finished balls refrigerated until ready to serve, or freeze them for longer-term preparation.
Do chocolate peanut butter balls need to be reheated?
No. These are a no-bake dessert and should not be reheated. Frozen balls should be thawed gradually in the refrigerator, then brought toward room temperature for a few minutes before serving.
Final Tips for the Best Gluten Free Chocolate Peanut Butter Balls
A great batch comes down to a few simple details: use thick peanut butter, add powdered sugar gradually, chill the centers before dipping, and melt the chocolate gently.
Keep the peanut butter mixture firm but creamy, and avoid overheating the chocolate. Those two texture points have the biggest impact on how easy the recipe is to shape and coat.
Remember to check packaged ingredients and practice careful kitchen hygiene when preparing the recipe for someone who needs strict gluten-free food.
Once the basic recipe becomes familiar, try dark chocolate with flaky sea salt, milk chocolate with chopped peanuts, or almond butter with dark chocolate for a different flavor combination.
These gluten free chocolate peanut butter balls are simple enough for a weeknight treat and versatile enough for holidays, parties, and edible gifts. Make a batch, keep a few chilled for dessert, and save the rest for whenever a chocolate-and-peanut-butter craving strikes.
