
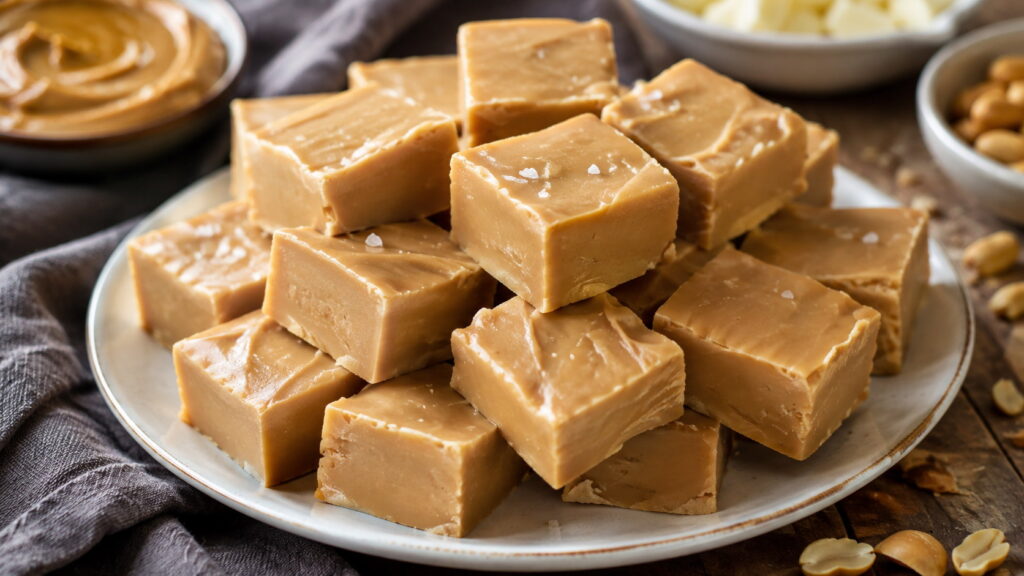
Rich, creamy, and incredibly easy to make, peanut butter fudge recipe using sweetened condensed milk is one of those desserts that delivers impressive results with very little effort. Whether you’re preparing homemade holiday treats, packaging edible gifts, or simply craving a smooth peanut butter dessert, every bite offers a melt-in-your-mouth texture without the stress of traditional candy making.
Everything below is designed to help you achieve consistently delicious fudge, from choosing the best peanut butter to understanding why sweetened condensed milk creates such a silky consistency. You’ll also find ingredient notes, preparation details, kitchen equipment, and foolproof step-by-step guidance to set you up for success.
Recipe at a Glance
| Detail | Information |
| Prep Time | 10 minutes |
| Cook Time | 5–8 minutes |
| Chill Time | 2–3 hours |
| Total Time | About 3 hours |
| Servings | 25–36 small squares |
| Difficulty | Beginner |
| Equipment | Medium saucepan or microwave-safe bowl, spatula, 8×8-inch pan, parchment paper |
In This Article
Why You’ll Love This Peanut Butter Fudge Recipe Using Sweetened Condensed Milk
Few homemade candies are as forgiving as peanut butter fudge made with sweetened condensed milk. Rather than relying on sugar syrups or candy thermometers, the ingredients work together to produce a dependable texture that’s smooth instead of crumbly.
Reasons home bakers return to this recipe again and again include:
- Only five basic pantry ingredients
- No candy thermometer required
- Ready to prepare in less than 15 minutes
- Exceptionally creamy texture
- Perfect for holidays, bake sales, and homemade gifts
- Easy to customize with chocolate, nuts, or festive toppings
- Freezes beautifully for future desserts
Sweetened condensed milk plays a major role beyond sweetness. Its concentrated milk solids help create a rich, stable fudge while reducing the risk of crystallization that often causes grainy homemade candy.
Peanut butter contributes flavor, healthy fats, and structure, giving every square a velvety bite that slices neatly after chilling.
Best occasions for making peanut butter fudge:
- Christmas cookie exchanges
- Thanksgiving dessert tables
- Birthday celebrations
- Potluck dinners
- Homemade gift boxes
- Weekend family treats
Ingredients That Make the Perfect Peanut Butter Fudge
Great fudge starts with quality ingredients. Every component has a purpose, so understanding each one helps produce better texture and flavor.
Core Ingredients
Sweetened Condensed Milk
Unlike evaporated milk, sweetened condensed milk contains sugar and has a thick consistency that creates creamy fudge without complicated cooking techniques.
Creamy Peanut Butter
Regular processed peanut butter usually produces the smoothest and most reliable texture. Stable emulsifiers prevent separation while delivering consistent richness.
White Chocolate Chips
White chocolate adds structure while balancing the savory peanut butter flavor. Choose high-quality baking chips for the smoothest melt.
Vanilla Extract
Pure vanilla rounds out the sweetness and enhances the roasted peanut flavor.
Salt (Optional but Recommended)
A small pinch brightens every ingredient and keeps the dessert from tasting overly sweet.
Choosing the Best Peanut Butter
Not every peanut butter behaves the same during cooking.
| Type | Result | Recommendation |
| Creamy processed peanut butter | Smooth, consistent fudge | Best choice |
| Crunchy peanut butter | Adds texture | Excellent variation |
| Natural peanut butter | Can separate because of oil | Stir thoroughly before using |
| Homemade peanut butter | Flavorful but less predictable | Use only if well emulsified |
Natural peanut butter isn’t impossible to use, but oil separation can produce softer or greasy fudge. Mixing the jar extremely well before measuring greatly improves results.
Helpful Ingredient Substitutions
| Original Ingredient | Substitute | Notes |
| White chocolate chips | Vanilla baking chips | Similar texture |
| Vanilla extract | Vanilla bean paste | Richer flavor |
| Creamy peanut butter | Crunchy peanut butter | Adds crunch |
| Regular salt | Fine sea salt | Slightly cleaner finish |
Kitchen Equipment
Keeping everything ready before melting ingredients makes preparation much easier.
You’ll need:
- Medium saucepan or microwave-safe mixing bowl
- Silicone spatula
- Measuring cups
- Measuring spoons
- 8×8-inch square baking pan
- Parchment paper
- Offset spatula or spoon for smoothing
Step-by-Step Peanut Butter Fudge Recipe Using Sweetened Condensed Milk
Following each stage carefully produces smooth, creamy fudge that cuts beautifully after chilling.
Prepare the Pan
Line an 8×8-inch baking pan with parchment paper, leaving enough overhang on two sides for easy lifting later.
Lightly pressing the parchment into the corners prevents wrinkles that can leave marks on the finished fudge.
Melt and Mix
Ingredients
- 1 (14-ounce) can sweetened condensed milk
- 2 cups white chocolate chips
- 1½ cups creamy peanut butter
- 1 teaspoon vanilla extract
- ¼ teaspoon salt (optional)
Stovetop Method
- Combine the sweetened condensed milk and white chocolate chips in a medium saucepan.
- Heat over low heat, stirring constantly until completely smooth.
- Remove from the heat immediately.
- Stir in the peanut butter until fully incorporated.
- Add vanilla extract and salt.
- Mix until glossy with no streaks remaining.
Microwave Method
- Combine condensed milk and white chocolate chips in a microwave-safe bowl.
- Heat in 20-second intervals, stirring thoroughly after each interval.
- Once smooth, mix in peanut butter, vanilla, and salt until silky.
Expert Tip: Avoid high heat. White chocolate scorches surprisingly fast, producing a thick, grainy mixture that won’t set as smoothly.
Readers interested in safe handling and storage of dairy-based desserts can also review the USDA’s food safety guidance: https://www.fsis.usda.gov/food-safety.
Set the Fudge
Transfer the warm mixture into the prepared pan.
Spread evenly using an offset spatula or the back of a spoon.
Tap the pan gently on the counter several times to release trapped air bubbles.
Refrigerate for 2 to 3 hours, or until the center feels completely firm when lightly pressed.
Slice and Serve
Lift the fudge out using the parchment overhang.
Warm a sharp knife under hot water, dry thoroughly, then slice into squares. Cleaning the blade between cuts produces professional-looking edges.
A finished batch should have:
- Smooth, glossy surface
- Creamy interior
- Clean-cut edges
- Firm texture that softens slightly at room temperature
- Rich peanut butter flavor balanced by subtle sweetness
Expert Tips for the Creamiest Peanut Butter Fudge Recipe Using Sweetened Condensed Milk
Small techniques often make the difference between good fudge and bakery-quality fudge. Paying attention to temperature, mixing, and ingredient quality helps create consistently smooth, creamy squares every time.
Use Low, Gentle Heat
White chocolate is more delicate than dark or milk chocolate. Slow, gentle heating prevents scorching and keeps the mixture silky.
Best practice: Remove the pan from the heat as soon as the chocolate has completely melted. Residual heat will finish the job without overcooking the mixture.
Measure Ingredients Accurately
Candy recipes rely on proper ratios.
Too much peanut butter can produce a soft fudge that struggles to firm up, while too little leaves the texture overly sweet and lacking richness.
Using standard measuring cups and leveling dry ingredients improves consistency.
Choose Quality Ingredients
Premium white chocolate generally melts more smoothly than inexpensive baking chips with higher amounts of stabilizers.
Pure vanilla extract also contributes a deeper, more balanced flavor compared to imitation vanilla.
Stir Until Completely Smooth
Continue mixing until no streaks remain.
A glossy, uniform appearance signals that the peanut butter and white chocolate have fully emulsified.
Don’t overmix once everything is smooth. Excessive stirring after the mixture cools can make the fudge thicker than desired.
Let the Fudge Chill Completely
Cutting too early is one of the most common reasons homemade fudge appears messy.
Allow at least 2 hours of refrigeration, though overnight chilling creates the cleanest slices.
Line the Pan Properly
Parchment paper makes removal effortless and keeps the bottom from sticking.
Leaving extra paper hanging over two sides creates convenient lifting handles.
Quick Success Checklist
- Use room-temperature peanut butter for easier mixing.
- Heat slowly over low heat.
- Stir constantly while melting.
- Avoid introducing water into the chocolate mixture.
- Cool completely before slicing.
- Use a warm knife for perfectly clean cuts.
Easy Recipe Variations to Try
One of the best things about a peanut butter fudge recipe using sweetened condensed milk is how easily the base recipe adapts to different flavors and occasions.
Chocolate Peanut Butter Swirl
Chocolate lovers can create beautiful marbled fudge with very little extra work.
Simply melt ½ cup semi-sweet chocolate chips separately, drizzle over the prepared fudge, then swirl gently with a knife before chilling.
Result:
- Rich chocolate flavor
- Attractive marble pattern
- Slightly less sweetness
Crunchy Peanut Butter Version
Creamy peanut butter produces a classic texture, but crunchy peanut butter adds satisfying bites of roasted peanuts throughout every piece.
Keeping the remaining ingredients unchanged ensures the fudge still sets properly.
Peanut Butter Marshmallow Fudge
Fold 1 cup mini marshmallows into the warm mixture just before pouring into the pan.
Small pockets of marshmallow create extra sweetness and a fun texture that’s especially popular with children.
Sea Salt Peanut Butter Fudge
Sprinkle flaky sea salt across the surface before chilling.
A light finishing salt enhances roasted peanut flavor while balancing sweetness.
Less is more. A small pinch delivers plenty of contrast.
Holiday Mix-In Ideas
Seasonal additions make homemade fudge perfect for celebrations and edible gifts.
Popular choices include:
- Chopped roasted peanuts
- Mini chocolate chips
- Peanut butter chips
- Crushed pretzels
- Toffee bits
- Mini peanut butter cups
- Colorful holiday sprinkles
- Crushed peppermint candies for winter celebrations
Flavor Inspiration Table
| Variation | Additional Ingredients | Best Occasion |
| Chocolate Swirl | Melted semi-sweet chocolate | Everyday dessert |
| Crunchy Peanut | Crunchy peanut butter | Peanut lovers |
| Salted Peanut Butter | Flaky sea salt | Holiday dessert boards |
| Pretzel Crunch | Crushed pretzels | Game day snacks |
| Peanut Butter Cup | Chopped peanut butter cups | Birthday treats |
| Festive Sprinkle | Colored sprinkles | Christmas and birthdays |
Common Mistakes and How to Fix Them
Even easy fudge recipes can run into problems if ingredients or temperatures aren’t quite right. Fortunately, most issues have simple solutions.
| Problem | Likely Cause | How to Fix It |
| Fudge won’t set | Too much peanut butter or insufficient chilling | Refrigerate longer or remake using accurate measurements |
| Texture is grainy | Chocolate overheated | Melt gently over low heat while stirring constantly |
| Mixture becomes very thick | Heated too long | Remove from heat immediately once smooth |
| Oily surface | Natural peanut butter separated | Stir peanut butter thoroughly before measuring |
| Chocolate won’t melt smoothly | Heat too high or moisture entered the bowl | Use dry utensils and lower heat |
| Fudge sticks to the pan | Pan wasn’t lined | Always use parchment paper with overhang |
Fudge Feels Too Soft
Soft fudge usually needs more chilling time.
Four hours in the refrigerator—or overnight—often solves the problem.
Persistent softness generally points to inaccurate ingredient measurements or excessive peanut butter.
Mixture Looks Oily
Oil separation typically occurs when natural peanut butter isn’t fully mixed before use.
Next time, stir the jar thoroughly until the oils are completely incorporated before measuring.
Fudge Turns Grainy
Graininess often develops when white chocolate becomes overheated.
Low heat and constant stirring remain the easiest way to prevent the problem.
Cutting Creates Crumbs
Warm the knife under hot water before each cut, wiping the blade clean between slices.
Clean knife + chilled fudge = neat, professional-looking squares.
Prevent Problems Before They Start
Remember these simple habits for reliable results every batch:
- Read the recipe completely before beginning.
- Measure every ingredient before heating.
- Use low heat throughout the melting process.
- Line the pan before mixing ingredients.
- Allow enough chilling time before serving.
- Store leftovers properly to preserve texture.
Serving Ideas and Perfect Pairings
Freshly made peanut butter fudge is rich enough to shine on its own, yet a few thoughtful serving ideas can turn simple squares into an impressive dessert for holidays, parties, or gift giving.
Create a Beautiful Dessert Platter
Arrange fudge alongside a variety of bite-sized treats for an eye-catching dessert board.
Great companions include:
- Chocolate truffles
- Brownie bites
- Shortbread cookies
- Chocolate-dipped pretzels
- Fresh strawberries
- Roasted mixed nuts
Adding fresh fruit helps balance the sweetness while introducing color and texture.
Package as Homemade Gifts
Peanut butter fudge travels well, making it an excellent edible gift.
Place squares in decorative tins or bakery boxes lined with parchment paper. Separating layers with wax paper prevents pieces from sticking together during transport.
Gift ideas include:
- Holiday hostess gifts
- Teacher appreciation treats
- Birthday gift baskets
- Care packages
- Cookie exchange boxes
Turn Fudge into a Dessert Topping
Small cubes of fudge can elevate everyday desserts.
Try using chopped pieces on:
- Vanilla ice cream
- Chocolate sundaes
- Cheesecake
- Brownies
- Waffles
- Pancakes for a decadent brunch
Beverage Pairings
Rich peanut butter flavor pairs beautifully with warm and cold drinks that complement its creamy sweetness.
| Beverage | Why It Works |
| Freshly brewed coffee | Balances sweetness with slight bitterness |
| Espresso | Intensifies roasted peanut notes |
| Cold milk | Classic pairing that softens richness |
| Hot chocolate | Creates an indulgent dessert experience |
| Chai latte | Warm spices complement peanut butter |
| Black tea | Cleanses the palate between bites |
Special Occasion Presentation
Serving fudge on decorative platters instantly makes homemade candy feel festive.
Popular finishing touches include:
- Drizzle with melted dark chocolate
- Sprinkle flaky sea salt
- Dust lightly with powdered sugar
- Garnish with chopped roasted peanuts
- Add festive sprinkles for seasonal celebrations
Serving Tip: Remove refrigerated fudge about 10–15 minutes before serving. Slightly softened fudge develops a creamier texture and fuller peanut butter flavor.
How to Store, Freeze, and Make Ahead
Proper storage keeps peanut butter fudge smooth and flavorful for days—or even months when frozen.
Room Temperature Storage
Cool kitchens allow fudge to stay fresh for short periods.
Store pieces in an airtight container away from direct sunlight and heat.
- Storage time: Up to 3 days
- Best for: Cool weather and immediate serving
Warmer environments can soften the fudge, so refrigeration is usually the better choice.
Refrigeration Tips
Refrigeration provides the best balance of freshness and texture.
Place fudge in a sealed container with parchment or wax paper between layers.
- Refrigerator life: 2 to 3 weeks
- Container: Airtight plastic or glass container
- Temperature: Standard refrigerator temperature
Keeping air out helps prevent the fudge from drying out or absorbing odors from other foods.
Freezing Instructions
Homemade peanut butter fudge freezes exceptionally well.
To freeze:
- Allow the fudge to chill completely.
- Slice into individual squares.
- Wrap portions in parchment or plastic wrap.
- Place wrapped pieces in a freezer-safe container or zip-top freezer bag.
- Label with the freezing date.
Freezer life: Up to 3 months for the best quality.
Thawing for the Best Texture
Transfer frozen fudge to the refrigerator overnight before serving.
Allow pieces to rest at room temperature for about 15 minutes before enjoying.
Gradual thawing helps preserve the smooth texture.
Make-Ahead Tips
Preparing fudge in advance is ideal for busy holidays and special events.
A simple timeline works well:
- 3 months ahead: Freeze fully prepared fudge.
- 1 week ahead: Refrigerate in an airtight container.
- 1 day ahead: Slice and arrange on serving trays.
- Just before serving: Add decorative toppings such as sea salt or chocolate drizzle.
Storage Guide
| Storage Method | Freshness |
| Room temperature | Up to 3 days |
| Refrigerator | 2–3 weeks |
| Freezer | Up to 3 months |
Frequently Asked Questions About Peanut Butter Fudge Recipe Using Sweetened Condensed Milk
Can I use natural peanut butter?
Yes, but natural peanut butter should be stirred thoroughly before measuring because separated oil can make the fudge greasy or prevent proper setting. Processed creamy peanut butter generally delivers the most reliable texture.
Can I make peanut butter fudge without white chocolate chips?
White chocolate helps the fudge set and provides a creamy consistency. Replacing it may require a different recipe formulation, so following the original ingredient list is recommended for dependable results.
Why is my peanut butter fudge too soft?
Soft fudge usually results from inaccurate ingredient measurements, too much peanut butter, or not enough chilling time. Refrigerating the fudge for several more hours—or overnight—often solves the problem.
Can I use crunchy peanut butter instead of creamy?
Absolutely. Crunchy peanut butter creates the same rich flavor while adding small peanut pieces for extra texture.
How long does homemade peanut butter fudge last?
Stored in an airtight container, fudge stays fresh for about 3 days at room temperature, 2 to 3 weeks in the refrigerator, or up to 3 months in the freezer.
Can I freeze peanut butter fudge?
Yes. Wrap individual squares well and place them in a freezer-safe container. Thaw overnight in the refrigerator before serving for the best texture.
Is peanut butter fudge gluten-free?
Most versions are naturally gluten-free, but always check labels on peanut butter, white chocolate chips, vanilla extract, and any mix-ins to verify they haven’t been produced with gluten-containing ingredients.
Can I double the recipe?
Yes. Double every ingredient proportionally and prepare the mixture in a larger saucepan. Pour into a 9×13-inch pan and allow slightly more chilling time before slicing.
Why does my fudge look oily after chilling?
Oil separation is usually caused by natural peanut butter or overheating the mixture. Mixing thoroughly and using gentle heat greatly reduces the chance of oily fudge.
What’s the best way to cut neat fudge squares?
Chill the fudge until firm, then use a sharp knife warmed under hot water. Dry the blade before each cut and wipe it clean between slices for crisp, professional-looking edges.
Ready to enjoy one of the easiest homemade candies you’ll ever make? Give this peanut butter fudge recipe using sweetened condensed milk a spot in your dessert rotation and discover why so many home cooks rely on it for holidays, family gatherings, and everyday sweet cravings.
Simple pantry ingredients, gentle heat, and a little patience while the fudge chills are all you need for rich, creamy squares with a smooth, melt-in-your-mouth texture. Once you’ve mastered the classic version, have fun experimenting with chocolate swirls, crunchy peanut butter, sea salt, or your favorite festive mix-ins to create a signature variation.
Whether you’re preparing edible gifts, stocking the freezer with make-ahead treats, or serving dessert after a special meal, homemade peanut butter fudge is always a crowd-pleaser.
Don’t forget to save the recipe for later, share it with fellow peanut butter lovers, and let us know which variation became your favorite. Happy fudge making!

1 thought on “Peanut Butter Fudge Recipe Using Sweetened Condensed Milk (Easy, Creamy & Foolproof)”