
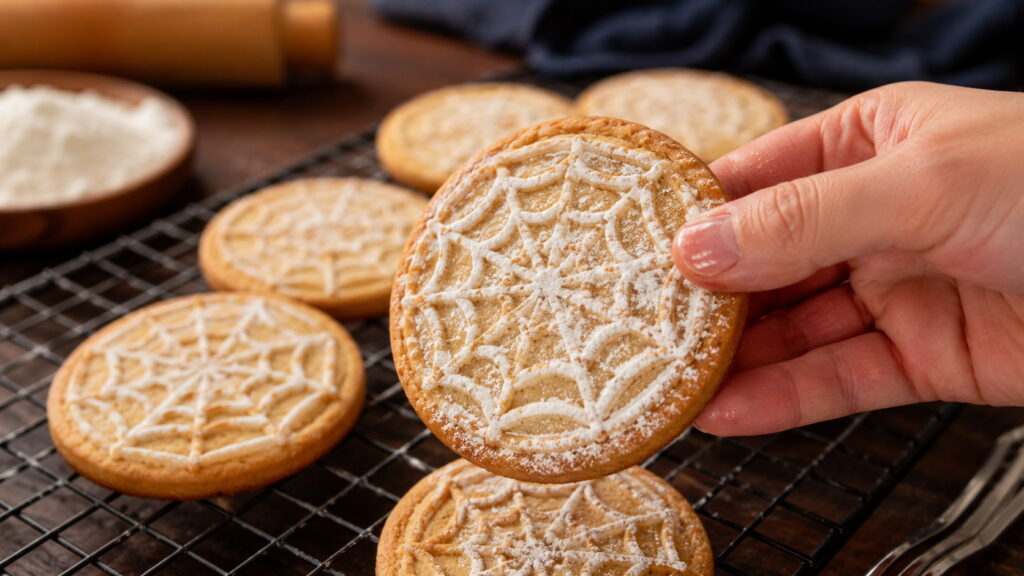
Spider web cookie stamp cookies easy recipe is the kind of bake that looks impressive but comes together with minimal effort. With the right dough, a simple stamping technique, and a few smart baking tips, you’ll get crisp, beautifully patterned cookies every time—no piping bags or decorating skills required.
This guide walks you through everything you need to know: how to make the dough, how to get clean stamp impressions, ingredient tips that actually matter, and easy variations to match your style. Whether you’re baking for Halloween, a themed party, or just for fun, these cookies deliver both flavor and visual impact.
In This Article
Why Spider Web Cookie Stamp Cookies Are the Perfect Easy Halloween Treat
Spider web cookies instantly create a festive mood without hours of decorating. The stamped design gives you a detailed, professional look in seconds, which makes them perfect for busy home bakers.
A few reasons these cookies stand out:
- Visually striking with minimal effort – the stamp does the work
- Kid-friendly baking project – fun and simple steps
- Customizable flavors – classic vanilla, chocolate, or spiced versions
- Perfect for sharing – ideal for parties, gift boxes, or dessert platters
The texture is just as appealing as the look. Expect lightly crisp edges with a tender center, especially when the dough is handled correctly and not overbaked.
What Makes This Spider Web Cookie Stamp Cookies Easy Recipe So Foolproof
Success with stamped cookies depends more on technique than complexity. This recipe is designed to remove common pain points so even beginners get clean, defined patterns.
Here’s why it works so well:
- Balanced dough consistency – firm enough to hold detail, soft enough to roll
- Chilling step included – prevents spreading and keeps designs sharp
- Simple ingredient list – no specialty items required
- No decorating stress – stamping replaces icing work
The key detail is dough structure. A slightly firmer dough holds the web pattern during baking, while too-soft dough leads to blurred designs. That’s why chilling isn’t optional—it’s essential for success.
Ingredients Breakdown for Spider Web Cookie Stamp Cookies
Understanding your ingredients helps you control both texture and flavor. Each component plays a specific role in making these cookies stamp-friendly.
Core Ingredients
- Unsalted butter (softened)
Provides richness and helps create a smooth dough. Properly softened butter blends evenly, preventing cracks in stamped cookies. - Granulated sugar
Sweetens and contributes to a slightly crisp finish. Too much sugar can cause spreading, so measurements matter. - Egg
Binds the dough and adds structure. Room temperature eggs mix more evenly. - Vanilla extract
Enhances flavor without overpowering. You can swap or combine with almond extract for variation. - All-purpose flour
The backbone of the dough. Gives structure and ensures the stamp holds its shape. - Salt
Balances sweetness and sharpens flavor.
Optional Flavor Boosters
- Cocoa powder for chocolate spider web cookies
- Black cocoa for a dramatic Halloween look
- Cinnamon or pumpkin spice for seasonal warmth
- Citrus zest for a fresh twist
Choosing the Right Dough Texture
The dough should feel:
- Soft but not sticky
- Easy to roll without tearing
- Firm enough to hold a stamp impression
If the dough sticks to your hands or stamp, it needs more chilling or a light dusting of flour.
Picking a Cookie Stamp That Works
- Deeply engraved designs produce clearer patterns
- Wooden or silicone stamps both work well
- Lightly dusting the stamp with flour prevents sticking
Getting this foundation right makes every next step easier—and ensures your spider web cookie stamp cookies easy recipe turns out clean, crisp, and bakery-worthy.
Kitchen Tools You’ll Need (And Smart Alternatives)
Great tools make a noticeable difference in how clean and consistent your spider web cookie stamp cookies turn out. Luckily, you don’t need anything complicated.
Essential Tools
- Cookie stamp (spider web design)
A deep, well-defined stamp creates sharper patterns that hold during baking. - Mixing bowls
One for wet ingredients, one for dry helps avoid overmixing. - Baking sheet
Use a heavy-duty sheet for even heat distribution. - Parchment paper
Prevents sticking and reduces browning on the bottoms. - Rolling pin
Ensures even dough thickness, which is critical for uniform baking.
Smart Alternatives
- No rolling pin? Use a clean glass bottle.
- No parchment paper? A lightly greased tray works, but watch for extra browning.
- No cookie stamp? The base of a glass with a textured pattern can mimic a simple design.
Pro Setup Tip
Keep everything cool—tools included. Warm hands or surfaces can soften the dough too quickly, making stamping less precise.
Step-by-Step: How to Make Spider Web Cookie Stamp Cookies Easy Recipe
Follow these steps carefully to get cookies that hold their shape and show off that beautiful spider web design.
Step 1: Prepare the Dough
- Cream softened butter and sugar until light and fluffy (about 2–3 minutes).
- Add the egg and vanilla extract, mixing until smooth.
- In a separate bowl, whisk flour and salt.
- Gradually combine dry ingredients into the wet mixture until a soft dough forms.
Texture cue: Dough should be soft but not sticky. If sticky, chill briefly before handling.
Step 2: Chill the Dough
- Wrap the dough and refrigerate for at least 1 hour.
- This step firms up the butter and prevents spreading during baking.
Important: Skipping chilling is the fastest way to lose your stamp design.
Step 3: Roll and Stamp
- Preheat oven to 175°C (350°F).
- Roll dough to about ¼ inch (6 mm) thickness.
- Lightly dust your cookie stamp with flour.
- Press firmly and evenly into the dough.
- Cut around the stamped design if needed, then transfer to a lined baking sheet.
Step 4: Bake to Perfection
- Bake for 10–12 minutes
- Edges should be lightly golden while the center stays pale
Doneness cue: Cookies should feel set but not hard when pressed lightly.
Step 5: Cool Properly
- Let cookies cool on the baking sheet for 5 minutes
- Transfer to a rack to cool completely
Cooling allows the structure to firm up and keeps the stamped details intact.
Pro Tips for Clean, Beautiful Spider Web Imprints Every Time
Perfect stamped cookies come down to a few small but crucial details. These tips make the difference between blurred and bakery-level results.
Keep the Dough at the Right Temperature
- Slightly chilled dough holds patterns best
- If dough softens while working, return it to the fridge for 10–15 minutes
Prevent Sticking to the Stamp
- Lightly dust the stamp with flour or powdered sugar
- Tap off excess to avoid buildup on the cookie surface
Control Dough Thickness
- Aim for ¼ inch thickness
- Too thin → pattern disappears
- Too thick → cookies may bake unevenly
Apply Even Pressure
- Press firmly but not aggressively
- Lift straight up to avoid smudging the design
Re-Stamp When Needed
If the pattern looks faint:
- Gently press the stamp again before baking
- Avoid overhandling, which softens the dough
Work in Small Batches
Keep unused dough chilled while stamping and baking. This keeps every batch consistent.
Mastering these small techniques ensures your spider web cookie stamp cookies easy recipe turns out crisp, detailed, and visually stunning every time.
Common Mistakes to Avoid When Making Cookie Stamp Cookies
Even a simple spider web cookie stamp cookies easy recipe can go wrong if a few key details are overlooked. Avoid these common mistakes to keep your designs sharp and your cookies perfectly textured.
Dough Too Soft or Warm
Soft dough spreads in the oven, which blurs the stamped pattern.
Fix: Chill the dough whenever it feels sticky or too pliable.
Skipping Chill Time
Chilling isn’t just a suggestion—it stabilizes the butter and helps the cookies hold their shape.
Fix: Chill for at least 1 hour, longer if your kitchen is warm.
Overworking the Dough
Too much handling warms the dough and develops gluten, leading to tougher cookies.
Fix: Mix just until combined and handle lightly when rolling.
Using Too Much Flour While Rolling
Excess flour dries out the dough and can dull the stamped design.
Fix: Use a light dusting only when needed.
Overbaking the Cookies
Overbaked cookies lose their tender texture and can darken the design.
Fix: Remove when edges are lightly golden and centers look set.
Uneven Dough Thickness
Inconsistent thickness leads to uneven baking and distorted patterns.
Fix: Roll evenly to about ¼ inch (6 mm) throughout.
Creative Variations for Your Spider Web Cookie Stamp Cookies Easy Recipe
Once you master the base dough, it becomes a canvas for creative twists. These variations keep your spider web cookie stamp cookies easy recipe exciting and adaptable for different occasions.
Chocolate Spider Web Cookies
Replace a portion of the flour with unsweetened cocoa powder.
Result: Rich flavor with a darker surface that highlights the web pattern beautifully.
Black Cocoa Halloween Version
Use black cocoa powder for a dramatic, almost black cookie.
Perfect for Halloween parties with a bold visual contrast.
Spiced Autumn Cookies
Add cinnamon, nutmeg, or pumpkin spice to the dough.
Creates a warm, seasonal flavor that pairs well with tea or coffee.
Glazed Spider Web Cookies
Brush or drizzle a thin powdered sugar glaze over cooled cookies.
The glaze settles into the grooves, enhancing the web design.
Sandwich Cookies
Spread chocolate ganache or buttercream between two stamped cookies.
Adds richness and turns them into a more indulgent dessert.
Citrus Twist Version
Mix in lemon or orange zest for a bright, refreshing flavor contrast.
Decorating Ideas Without Extra Effort
Stamped cookies already look detailed, so decorating should enhance—not overpower—the design. These simple ideas keep the process easy while boosting visual appeal.
Light Dusting for Subtle Contrast
- Sprinkle powdered sugar over darker cookies
- Use cocoa powder for lighter doughs
This highlights the web pattern without extra steps.
Minimal Glaze Enhancement
A thin glaze made from powdered sugar and milk can:
- Settle into the grooves
- Make the pattern pop
- Add a slight sheen
Tip: Keep the glaze light so it doesn’t fill in the design completely.
Edible Sparkle for Festive Touch
- Add a pinch of edible glitter or sanding sugar
- Focus on the edges for a subtle shimmer
Keep It Clean and Simple
Sometimes the best look is no decoration at all. A well-stamped cookie with clean edges and defined lines already delivers a professional finish.
These easy decorating ideas let your spider web cookie stamp cookies easy recipe shine without turning it into a time-consuming project.
How to Store and Keep Your Cookies Fresh Longer
Keeping your spider web cookie stamp cookies easy recipe fresh is simple when stored correctly. The goal is to preserve both texture and the crisp stamped design.
Room Temperature Storage
- Store cookies in an airtight container
- Keep at cool room temperature (20–22°C)
- Best enjoyed within 4–5 days
Tip: Place parchment paper between layers to protect the stamped patterns.
Keeping Cookies Crisp vs Soft
- For crisp cookies: store without moisture (no bread slices inside)
- For softer texture: add a small piece of bread to the container
Freezing Options
- Baked cookies: Freeze up to 2 months in a sealed container
- Cookie dough: Wrap tightly and freeze for up to 2 months
When ready to use frozen dough, thaw in the refrigerator overnight before rolling and stamping.
Make-Ahead Tips for Stress-Free Baking
Planning ahead makes this recipe even easier, especially for holidays or events.
Prepare Dough in Advance
- Make the dough up to 2 days ahead
- Store wrapped in the refrigerator
- Let sit at room temperature for 10–15 minutes before rolling if too firm
Freeze Before Baking
- Stamp cookies, then freeze them on a tray
- Bake directly from frozen, adding 1–2 extra minutes to baking time
Batch Baking Strategy
- Divide dough into smaller portions
- Work with one portion at a time while keeping the rest chilled
This approach keeps every batch consistent and prevents the dough from softening too much.
Serving Ideas for Parties, Gifts, or Seasonal Displays
Spider web cookies aren’t just tasty—they’re visually perfect for themed presentations.
Party Presentation Ideas
- Arrange on a Halloween dessert platter with contrasting treats
- Pair with dark chocolate desserts for a dramatic look
- Stack cookies in a pyramid for a centerpiece effect
Drink Pairings
- Hot chocolate for a cozy, sweet pairing
- Coffee or espresso to balance the sweetness
- Spiced tea for a seasonal twist
Gifting Ideas
- Wrap in clear bags with ribbon for festive gifts
- Pack in decorative boxes with parchment lining
- Add a handwritten tag for a personal touch
These cookies travel well, making them ideal for sharing.
Frequently Asked Questions About Spider Web Cookie Stamp Cookies Easy Recipe
Why isn’t my stamp pattern showing clearly?
The dough is likely too soft or too warm. Chill it longer and lightly dust the stamp with flour before pressing.
Can I use any cookie dough for stamping?
Not all doughs work well. A firmer, low-spread dough like shortbread or sugar cookie dough is best.
Do I really need to chill the dough?
Yes. Chilling prevents spreading and helps the cookies hold their shape and detailed pattern.
How do I clean and maintain cookie stamps?
Wash gently with warm water and dry immediately. For wooden stamps, avoid soaking to prevent cracking. You can follow safe kitchen cleaning practices recommended by USDA Kitchen Food Safety Basics to keep tools hygienic.
Can I make these cookies without a stamp?
Yes. You can press designs using textured objects or lightly score a web pattern with a knife, though results will be less defined.
Quick Recipe Summary Card (At-a-Glance Guide)
Prep Time: 15 minutes
Chill Time: 1 hour
Bake Time: 10–12 minutes
Total Time: ~1 hour 30 minutes
Yield: 20–24 cookies
Key Ingredients
- Butter
- Sugar
- Egg
- Vanilla
- Flour
- Salt
Quick Steps Overview
- Cream butter and sugar
- Add egg and vanilla
- Mix in dry ingredients
- Chill dough
- Roll, stamp, and cut
- Bake and cool
Final Thoughts: Making Beautiful Cookies the Easy Way
Spider web cookie stamp cookies easy recipe proves that beautiful baking doesn’t have to be complicated. With the right dough, proper chilling, and a simple stamping technique, you can create cookies that look impressive and taste even better.
Try different flavors, experiment with subtle decorations, and make the recipe your own. Save it for your next celebration or bake a batch just because—it’s the kind of recipe you’ll come back to again and again.
