
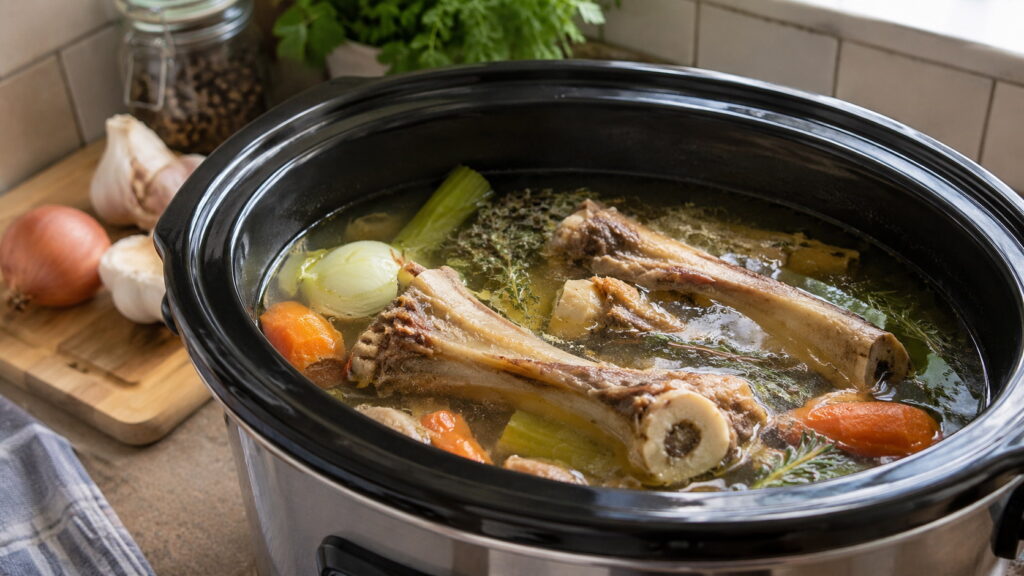
A recipe for bone broth in crock pot is one of the simplest ways to create a deeply flavorful, nutrient-rich broth with very little hands-on effort. Slow cooking gives the bones plenty of time to release collagen, minerals, and savory flavors, resulting in a broth that’s ideal for sipping, cooking, and meal prep.
Readers will learn how to choose the best bones, understand why each ingredient matters, master slow cooker cooking times, avoid common mistakes, and discover easy ways to customize homemade bone broth. Helpful storage tips, serving ideas, and frequently asked questions later in the guide will make the entire process approachable, even for beginners.
Whether you’re preparing a comforting mug of broth on a chilly day or stocking your freezer with a versatile cooking staple, a crock pot delivers consistent results with minimal attention.
In This Article
Why This Recipe for Bone Broth in Crock Pot Is Worth Making
Homemade bone broth has earned a place in many kitchens because of its incredible versatility. Rich flavor, silky texture, and simple ingredients make every batch useful in far more than soups.
Slow cookers are especially well suited for bone broth because they maintain a gentle, consistent temperature over many hours. Gentle cooking encourages collagen and connective tissue to dissolve gradually without aggressively boiling the broth, helping produce a cleaner taste and a richer mouthfeel.
More Flavor with Less Effort
Long cooking times often sound intimidating, but a crock pot does nearly all the work.
Once the ingredients are added, the slow cooker quietly simmers while you go about your day. Unlike stovetop methods, there’s little need to monitor evaporation or constantly adjust heat levels.
A Budget-Friendly Kitchen Staple
Soup bones are often one of the most affordable cuts available at butcher shops and grocery stores. Turning inexpensive bones into several quarts of homemade broth stretches your grocery budget while reducing food waste.
Roast chicken carcasses, leftover beef bones, turkey frames after the holidays, and even pork bones can all become delicious homemade broth.
Perfect for Meal Prep
Fresh bone broth can be used throughout the week in many different meals.
Some popular uses include:
- Sipping warm with herbs and black pepper
- Homemade soups and stews
- Cooking rice, quinoa, or barley
- Braising meats
- Pan sauces and gravies
- Mashed potatoes for extra richness
Large batches also freeze exceptionally well, making future meals quicker and more flavorful.
Naturally Rich Without Artificial Ingredients
Store-bought broth can be convenient, but homemade versions allow complete control over every ingredient.
Benefits include:
- No unnecessary preservatives
- Adjustable sodium levels
- Fresh vegetables and herbs
- Choice of high-quality bones
- Custom flavor profiles
Those seeking general nutrition guidance can also explore recommendations from the Academy of Nutrition and Dietetics: https://www.eatright.org, which offers evidence-based information about healthy eating and balanced meal planning.
Ingredients That Build a Rich, Flavorful Bone Broth
Excellent bone broth begins with thoughtful ingredient selection. Every ingredient contributes something important, whether flavor, aroma, body, or color.
Essential Ingredients
Bones (4–5 pounds)
Choose one type or combine several:
- Beef marrow bones
- Knuckle bones
- Oxtail
- Chicken backs
- Chicken feet
- Turkey necks
- Pork neck bones
Vegetables
- 2 onions, quartered
- 3 carrots, chopped
- 3 celery stalks, chopped
- 1 whole garlic bulb, halved (optional)
Vegetables provide sweetness and aromatic depth without overpowering the broth.
Apple Cider Vinegar (2 tablespoons)
Many home cooks add apple cider vinegar because its acidity helps extract minerals from the bones during the long cooking process. Only a small amount is needed, and the finished broth won’t taste sour.
Herbs and Aromatics
Classic choices include:
- 2 bay leaves
- Fresh parsley stems
- Thyme
- Whole black peppercorns
- Rosemary (optional)
Whole spices work better than ground spices because they produce a cleaner broth that’s easier to strain.
Water
Fill the crock pot until the bones are just covered.
Avoid overfilling. Too much water creates a weaker broth with less concentrated flavor.
Optional Flavor Boosters
Consider adding one or two of the following:
- Fresh ginger slices
- Turmeric root
- Leek tops
- Mushrooms
- Dried shiitake mushrooms
- Parsnip
- Small piece of kombu
Each ingredient creates subtle complexity while allowing the natural bone flavor to remain the star.
Ingredient Substitutions
| Ingredient | Best Substitute | Result |
| Onion | Shallots or leeks | Mild sweetness |
| Celery | Fennel stalks | Slight herbal flavor |
| Apple cider vinegar | White wine vinegar | Similar acidity |
| Thyme | Oregano or marjoram | Different herbal profile |
| Parsley | Cilantro stems | Fresh finish |
Equipment You’ll Need
- Large crock pot (6–8 quart recommended)
- Fine mesh strainer
- Cheesecloth (optional for extra-clear broth)
- Large bowl
- Storage jars or freezer-safe containers
- Ladle
Choosing the Right Bones for the Best Recipe for Bone Broth in Crock Pot
Bone selection has the biggest influence on flavor, body, and gelatin content. Combining several types often produces the most balanced results.
Marrow Bones
Marrow bones create a luxurious, rich broth with a silky texture.
Best qualities include:
- Deep beef flavor
- Rich mouthfeel
- High fat content
- Excellent for sipping
Knuckle and Joint Bones
Connective tissue makes these especially valuable.
Natural collagen slowly dissolves during long cooking, creating broth that often gels after refrigeration—a sign of abundant gelatin rather than a problem.
Meaty Bones
Bones with attached meat contribute savory flavor and additional richness.
Excellent options include:
- Beef shanks
- Oxtail
- Chicken backs
- Turkey frames
- Pork neck bones
Raw vs. Roasted Bones
Both methods produce excellent broth, but they create noticeably different flavors.
| Raw Bones | Roasted Bones |
| Cleaner flavor | Richer, deeper flavor |
| Lighter color | Dark amber color |
| Delicate aroma | Caramelized notes |
| Great for chicken broth | Excellent for beef broth |
Roasting Tip: Roast beef bones at 425°F (220°C) for 35–45 minutes, turning once, until well browned but not burnt. Browning develops complex flavors that carry into the finished broth.
Fresh or Frozen?
Frozen bones work perfectly well.
Thawing isn’t required before adding them to the crock pot, although partially thawed bones may fit more easily if space is limited.
Where to Buy Quality Bones
Reliable sources include:
- Local butcher shops
- Farmers markets
- Grocery store meat departments
- Local farms selling grass-fed beef or pasture-raised poultry
Bones from animals with healthy diets often provide richer flavor, although technique plays an equally important role. Choosing a mixture of marrow, joint, and meaty bones generally delivers the best balance of flavor, body, and gelatin in a homemade recipe for bone broth in crock pot.
How to Make Bone Broth in a Crock Pot Step by Step
Making a flavorful bone broth is mostly a matter of giving quality ingredients enough time to work their magic. Careful preparation at the beginning leads to a cleaner-tasting, richer finished broth.
Recipe Overview
| Detail | Amount |
| Prep Time | 20 minutes (plus optional roasting) |
| Cook Time | 18–24 hours |
| Total Time | 18–24 hours 20 minutes |
| Servings | About 10–12 cups |
| Difficulty | Easy |
Step 1: Roast the Bones (Optional but Recommended)
Roasting is especially worthwhile when making beef or pork bone broth because caramelization creates a deeper, richer flavor.
- Preheat the oven to 425°F (220°C).
- Arrange bones in a single layer on a baking sheet.
- Roast for 35–45 minutes, turning halfway through.
- Transfer the bones to the crock pot.
- Pour a small amount of hot water into the roasting pan, scrape up the browned bits, and add the liquid to the slow cooker. Those browned bits contain concentrated flavor.
Chicken bones may be used raw or roasted, depending on the flavor profile you prefer.
Step 2: Add the Vegetables and Aromatics
Place the prepared vegetables around the bones.
Add:
- Quartered onions
- Chopped carrots
- Chopped celery
- Garlic (optional)
- Bay leaves
- Thyme
- Parsley stems
- Whole peppercorns
Keeping herbs whole makes straining much easier later.
Step 3: Add Vinegar and Water
Pour 2 tablespoons of apple cider vinegar over the ingredients.
Cover everything with cold water until the bones are just submerged, leaving about 1 inch of space below the rim of the crock pot.
Avoid completely filling the slow cooker. Leaving a little room helps prevent spills during long cooking.
Step 4: Slow Cook Low and Slow
Set the crock pot to Low for the best flavor and texture.
Recommended cooking times:
| Bone Type | Ideal Cooking Time |
| Chicken | 12–18 hours |
| Turkey | 18–24 hours |
| Beef | 18–24 hours |
| Pork | 16–20 hours |
Longer cooking extracts more collagen and creates a fuller-bodied broth without requiring extra work.
Step 5: Check the Broth
Finished bone broth should have:
- A rich golden or deep amber color
- Pleasant roasted aroma
- Full-bodied savory flavor
- Slightly silky texture
Cloudiness is perfectly normal and doesn’t affect flavor or quality.
Step 6: Strain Carefully
Remove the larger bones using tongs.
Pour the broth through a fine-mesh strainer lined with cheesecloth if you prefer an exceptionally clear broth.
Discard the cooked vegetables and herbs. After many hours of simmering, they have already contributed nearly all of their flavor.
Step 7: Cool Safely
Cool the broth as quickly as practical before refrigerating.
A simple method:
- Divide the broth into smaller containers.
- Place containers in an ice-water bath.
- Refrigerate once no longer steaming.
Once chilled, a layer of fat will solidify on top. Leave the fat in place for storage or remove it before reheating, depending on your preference.
Simple Tips That Make Bone Broth Richer and More Flavorful
Small adjustments can make a noticeable difference in the finished broth. Experienced home cooks rely on a few proven techniques to maximize flavor without adding unnecessary ingredients.
Combine Different Types of Bones
Using only marrow bones creates richness, while using only meaty bones emphasizes savory flavor.
A balanced combination often includes:
- 40% joint or knuckle bones
- 30% marrow bones
- 30% meaty bones
Mixing bone types produces broth with excellent body, gelatin, and depth.
Don’t Add Too Much Water
Bones should be just covered.
Excess water dilutes the flavor and reduces the natural richness developed during the long cooking process.
Wait to Add Salt
Salting early can make the finished broth overly salty because liquid gradually evaporates during cooking.
Season individual recipes—or your mug of broth—after reheating instead.
Leave the Lid Closed
Every time the lid is removed, heat escapes and cooking slows.
Resist the temptation to check frequently. One or two quick checks during an 18- to 24-hour cook are usually sufficient.
Roast Beef Bones for Maximum Flavor
Roasting develops natural sweetness through caramelization.
Broth made with roasted bones often has:
- Darker color
- More complex aroma
- Fuller beef flavor
- Richer finish
Chicken broth can be delicious either with roasted bones or raw bones, depending on whether you prefer a lighter or heartier result.
Look for Natural Gelatin
Don’t worry if your broth becomes jelly-like after refrigeration.
Gelatin is actually a sign of a collagen-rich broth. Once reheated, the broth will return to a smooth liquid consistency.
Skim Only When Necessary
Heavy boiling can create foam, particularly early in cooking.
A gentle skim during the first hour is enough if foam appears. Slow cookers generally produce much less scum than stovetop stockpots because they maintain a steady, low simmer.
Common Mistakes That Can Ruin Your Recipe for Bone Broth in Crock Pot
Bone broth is forgiving, but a handful of common mistakes can lead to disappointing flavor or texture. Avoiding them helps ensure consistently delicious results.
Using Too Much Water
Adding extra water may seem harmless, but it weakens the broth considerably.
Better approach: Add only enough water to cover the bones. Concentrated broth can always be diluted later if needed.
Choosing Only One Type of Bone
Marrow bones alone provide richness but little gelatin.
Joint bones alone provide body but less robust flavor.
Combining several varieties creates a more balanced broth with both depth and texture.
Cooking for Too Short a Time
Bone broth needs patience.
While chicken broth develops relatively quickly, beef bones benefit from 18–24 hours on the Low setting to extract collagen and develop a full-bodied flavor.
Cooking on High Heat
High heat may seem like a shortcut, but rapid simmering can emulsify fat into the broth, producing a cloudy appearance and a less refined flavor.
Low, gentle heat consistently delivers the best results.
Overloading the Crock Pot with Vegetables
Vegetables enhance the broth but should support—not overpower—the bones.
Too many carrots can make the broth overly sweet, while excessive celery may introduce bitterness after prolonged cooking.
Stick to a balanced ratio of aromatics for the cleanest flavor.
Seasoning Too Aggressively
Large amounts of salt, soy sauce, or strong spices can limit how the broth is used later.
Keeping the broth lightly seasoned makes it suitable for soups, sauces, grains, braises, or sipping. Final seasoning can always be adjusted when serving.
Throwing Away the Fat Too Soon
The solidified fat layer that forms after chilling acts as a natural seal, helping protect the broth during refrigeration.
Remove the fat just before using the broth, or save it separately for roasting vegetables or sautéing onions to add extra flavor to future meals.
Easy Variations to Customize Your Bone Broth
One of the biggest advantages of making homemade bone broth is the ability to tailor every batch to your cooking style. Changing the bones, herbs, or aromatics creates entirely different flavor profiles while following the same basic method.
Classic Beef Bone Broth
Beef broth delivers bold flavor and a rich, silky texture that works beautifully in hearty recipes.
Best bones to use:
- Marrow bones
- Knuckle bones
- Oxtail
- Beef shanks
Recommended herbs:
- Thyme
- Bay leaves
- Rosemary
- Black peppercorns
Ideal uses include French onion soup, beef stew, pot roast, gravies, and sipping on its own.
Light and Comforting Chicken Bone Broth
Chicken bone broth has a milder flavor and cooks a bit faster than beef.
Excellent bone choices include:
- Chicken backs
- Wings
- Necks
- Carcasses from roasted chickens
- Chicken feet for extra gelatin
Fresh parsley, thyme, garlic, and a few peppercorns create a clean, comforting broth that’s perfect for chicken noodle soup, risotto, or cooking rice.
Turkey Bone Broth
Holiday leftovers become an outstanding homemade broth.
Turkey frames and necks produce a rich broth with a slightly deeper flavor than chicken while remaining lighter than beef.
Extra sage and rosemary complement turkey especially well.
Mixed Bone Broth
Combining different animal bones creates remarkable depth.
Popular combinations include:
- Beef and pork
- Chicken and turkey
- Beef with oxtail
- Chicken with chicken feet
Balanced blends often produce the richest texture thanks to varying amounts of collagen and marrow.
Herb-Forward Bone Broth
Fresh herbs can subtly change the personality of your broth without overwhelming the natural flavors.
Try combinations such as:
- Thyme and parsley
- Rosemary and bay leaves
- Dill stems with chicken broth
- Sage and thyme with turkey broth
Avoid adding delicate fresh herbs during the final hour. Long cooking can mute their brightest flavors.
Ginger and Turmeric Wellness Broth
Fresh ginger and turmeric create a warm, aromatic variation that’s especially enjoyable for sipping.
Add:
- 2-inch piece fresh ginger, sliced
- 1-inch piece fresh turmeric, sliced (or 1 teaspoon ground turmeric)
- Few whole black peppercorns
Lemon juice can be stirred into individual servings after reheating for extra brightness.
Low-Sodium Version
Many commercial broths contain significant amounts of sodium.
Homemade broth stays far more versatile when cooked without salt.
Benefits include:
- Easier seasoning later
- Better control for special diets
- Greater flexibility in soups and sauces
- Reduced risk of overly salty finished dishes
How to Serve Bone Broth Beyond a Simple Mug
Homemade bone broth is much more than a warm beverage. Rich flavor and natural body make it one of the most versatile ingredients in the kitchen.
Sip It as a Comforting Drink
Warm a cup gently on the stove or in the microwave.
Customize each serving with:
- Fresh cracked black pepper
- Chopped parsley
- Chives
- Lemon juice
- Fresh ginger
- Pinch of sea salt
A drizzle of good olive oil can also add richness and aroma.
Build Better Soups and Stews
Replacing water or boxed broth with homemade bone broth adds layers of flavor to recipes such as:
- Vegetable soup
- Chicken noodle soup
- Beef barley soup
- Lentil soup
- Chili
- White bean soup
Even simple soups gain more depth from a collagen-rich broth.
Cook Grains with More Flavor
Rice, quinoa, farro, barley, and couscous absorb the savory flavor of bone broth as they cook.
Replace water with an equal amount of broth for a simple upgrade that doesn’t require additional seasoning.
Create Restaurant-Quality Sauces
Bone broth makes an excellent base for pan sauces because of its natural gelatin.
After searing meat:
- Deglaze the pan with a splash of wine or water.
- Add bone broth.
- Simmer until reduced.
- Finish with a small amount of butter for a glossy sauce.
Natural gelatin helps create a luxurious texture without flour or cornstarch.
Braise Meats and Vegetables
Short ribs, pot roast, pork shoulder, and even hearty vegetables benefit from slow braising in homemade broth.
Deep flavor develops while the collagen contributes extra richness to the cooking liquid.
Delicious Pairings
| Dish | Why It Works |
| Roast chicken | Complements delicate poultry flavors |
| Pot roast | Enhances beef richness |
| Mashed potatoes | Adds savory depth |
| Wild rice | Absorbs rich broth beautifully |
| Roasted root vegetables | Balances natural sweetness |
| Crusty sourdough bread | Perfect for dipping into warm broth |
Beverage Pairings
When bone broth is served as part of a meal, consider beverages that won’t overpower its savory flavor.
Good choices include:
- Sparkling water with lemon
- Unsweetened iced tea
- Light herbal teas
- Dry white wine with poultry dishes
- Medium-bodied red wine with beef-based meals
Storage, Freezing, and Reheating Tips
Making a large batch is one of the biggest advantages of a recipe for bone broth in crock pot. Proper storage preserves flavor and makes future meals much easier to prepare.
Refrigeration
Allow the broth to cool before transferring it to airtight containers.
Storage guidelines:
- Refrigerator: 4–5 days
- Keep containers tightly sealed.
- Leave the fat layer intact if storing for several days, as it helps protect the broth from air exposure.
Freezing
Bone broth freezes exceptionally well.
Great storage options include:
- Freezer-safe glass jars (leave headspace for expansion)
- Silicone freezer trays
- Souper cubes
- Freezer bags laid flat
- Portion-sized containers
Freezer life: Up to 6 months for the best flavor, although properly frozen broth may remain safe beyond that. Label containers with the preparation date to make rotation easier.
Meal Prep Ideas
Keeping portions ready to use saves time throughout the week.
Freeze broth in:
- 1-cup portions for soups
- 2-cup portions for recipes
- Ice cube trays for sauces
- Half-cup servings for cooking grains
Small portions thaw quickly and reduce waste.
Best Ways to Reheat
Reheat gently to preserve flavor and texture.
Recommended methods:
Stovetop
- Warm over medium-low heat until steaming.
- Avoid vigorous boiling.
Microwave
- Heat in 30- to 60-second intervals.
- Stir between intervals for even heating.
Only reheat the amount you plan to use.
Why Did My Broth Turn Into Jelly?
Many first-time cooks worry when chilled broth becomes firm.
Good news: Gelled broth is usually a sign of successful collagen extraction. Once warmed, the gelatin melts back into a smooth, rich liquid with the same great flavor.
Signs Your Bone Broth Has Spoiled
Discard the broth if you notice:
- Sour or unpleasant odor
- Mold growth
- Bubbling while refrigerated
- Slimy texture
- Unusual discoloration
Proper cooling, clean containers, and prompt refrigeration greatly reduce the risk of spoilage, ensuring your homemade bone broth stays fresh and ready for your next meal.
Nutrition Highlights and Wellness Benefits
Homemade bone broth is valued for its rich flavor, versatility, and naturally occurring nutrients. While the exact nutrition varies depending on the type of bones used, cooking time, and whether the fat is skimmed, every batch offers a wholesome base for countless meals.
What You’ll Find in Bone Broth
Slow cooking helps release naturally occurring compounds from bones and connective tissues, including:
- Protein, largely from gelatin
- Collagen-derived amino acids
- Minerals such as calcium, phosphorus, magnesium, and potassium (amounts vary)
- Natural electrolytes
- Trace minerals from the bones and vegetables
Homemade broth also allows complete control over sodium, making it easier to fit different dietary preferences.
Estimated Nutrition Per 1 Cup
| Nutrient | Approximate Amount |
| Calories | 35–60 |
| Protein | 8–10 g |
| Fat | 0–3 g (depending on skimming) |
| Carbohydrates | Less than 1 g |
| Sodium | Varies based on seasoning |
Nutritional values are estimates and will differ based on ingredients and preparation methods.
Why Many Home Cooks Love Bone Broth
Bone broth has become a staple for people looking to prepare nourishing meals with simple ingredients.
Many cooks appreciate it because it:
- Adds rich flavor without relying on heavy sauces
- Creates satisfying soups and stews
- Works well in meal prep
- Provides a protein-rich cooking liquid
- Makes homemade recipes taste more robust than using water
Although bone broth is often associated with wellness trends, scientific evidence supporting specific health claims remains limited. Enjoying bone broth as part of a balanced diet is a practical approach. Reliable nutrition information is available from organizations such as the Academy of Nutrition and Dietetics at https://www.eatright.org.
Frequently Asked Questions About Recipe for Bone Broth in Crock Pot
Can I make a recipe for bone broth in crock pot without roasting the bones?
Absolutely. Raw bones produce a lighter-colored broth with a cleaner, more delicate flavor. Roasting simply adds deeper caramelized notes, especially when using beef bones.
How long should bone broth cook in a crock pot?
Chicken bones generally need 12–18 hours, while beef and turkey bones benefit from 18–24 hours on the Low setting.
Why do I need apple cider vinegar?
Apple cider vinegar adds mild acidity, which many cooks believe helps draw minerals from the bones during the long cooking process. Only a small amount is necessary, and the finished broth should not taste like vinegar.
Can I reuse the bones for another batch?
Yes, although the second batch will usually be lighter in flavor and contain less gelatin. Fresh vegetables and herbs should always be added for each new batch.
Why didn’t my broth gel after refrigeration?
Several factors affect gelatin formation, including the type of bones, cooking time, and the amount of water used. Joint bones, knuckles, and chicken feet contain the most collagen. Even if your broth stays liquid, it can still be flavorful and useful.
Can vegetables be left out completely?
Yes. Bones, water, and a small amount of vinegar are enough to make bone broth. Vegetables simply add sweetness and aromatic depth.
Should salt be added during cooking?
Waiting until the broth is finished is usually the better choice. Unsalted broth is far more versatile because it can be seasoned differently depending on whether it’s used in soup, sauces, grains, or enjoyed by the cup.
Can bone broth be left in the crock pot overnight?
Yes, provided your slow cooker is functioning properly and set to the Low setting according to the manufacturer’s instructions. Slow cookers are designed for long, unattended cooking sessions.
What’s the difference between bone broth and stock?
Bone broth is typically cooked much longer than traditional stock, allowing more collagen to dissolve into the liquid. Stock often cooks for 2–6 hours, while bone broth commonly simmers for 12–24 hours.
Can I freeze bone broth in glass jars?
Yes. Choose freezer-safe jars and leave at least 1 inch of headspace so the liquid has room to expand as it freezes.
Master Your Homemade Bone Broth
Making a recipe for bone broth in crock pot is one of the easiest ways to create a flavorful kitchen staple that can elevate everything from soups and sauces to grains and braised dishes. Choosing a good mix of bones, allowing enough time for gentle simmering, and following a few simple techniques will reward you with a broth that’s rich, satisfying, and incredibly versatile.
Don’t hesitate to experiment with different combinations of bones, herbs, and aromatics to discover your favorite version. Every batch is an opportunity to refine the flavor and make the recipe your own.
If you enjoyed this homemade recipe for bone broth in crock pot, save it for your next meal prep session, share it with fellow home cooks, and keep a few portions in the freezer—you’ll appreciate having rich, homemade broth ready whenever a recipe calls for it.
